mNo edit summary |
mNo edit summary |
||
| (2 intermediate revisions by 2 users not shown) | |||
| Line 1: | Line 1: | ||
| + | {{InfoboxTreasurePods |
||
| − | __FORCETOC__ |
||
| + | |image = The_Glass_Desert.png |
||
| ⚫ | |||
| + | |pods1 = x0 |
||
| + | |pods2 = x7 |
||
| + | |pods3 = x15 |
||
| + | |podsecret = x4* |
||
| + | |podtotal = 22<br /><small>*26 with the [[Treasure Pods/Secret Style|Secret Style Pack]] installed.</small> |
||
| + | }} |
||
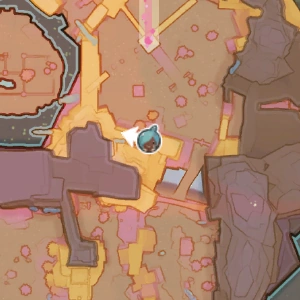
This page lists all of the available [[Treasure Pods]] in [[The Glass Desert]]. Before starting, it is recommended to activate [[Map_Data_Nodes/Locations#The Glass Desert|The Glass Desert's Map Data Node]] to unlock terrain details on the [[World Map]]. |
This page lists all of the available [[Treasure Pods]] in [[The Glass Desert]]. Before starting, it is recommended to activate [[Map_Data_Nodes/Locations#The Glass Desert|The Glass Desert's Map Data Node]] to unlock terrain details on the [[World Map]]. |
||
| Line 7: | Line 13: | ||
Additionally, there are no Green Treasure Pods in The Glass Desert, so the '''Treasure Cracker MK II''' is required to start opening them, however the '''Treasure Cracker ''MK III''''' is recommended since almost all of them are purple pods. |
Additionally, there are no Green Treasure Pods in The Glass Desert, so the '''Treasure Cracker MK II''' is required to start opening them, however the '''Treasure Cracker ''MK III''''' is recommended since almost all of them are purple pods. |
||
| + | __TOC__ |
||
| + | {{clr}} |
||
| Line 22: | Line 30: | ||
|[[Butterscotch Slime Lamp]]<br />[[File:ButterscotchSlimeLamp.png|70px|link=Butterscotch Slime Lamp]] |
|[[Butterscotch Slime Lamp]]<br />[[File:ButterscotchSlimeLamp.png|70px|link=Butterscotch Slime Lamp]] |
||
|} |
|} |
||
| − | |||
==='''Ruined Desert Blocks'''=== |
==='''Ruined Desert Blocks'''=== |
||
| Line 36: | Line 43: | ||
|[[Ruined Desert Blocks]]<br />[[File:RuinedDesertBlocks.png|70px|link=Ruined Desert Blocks]] |
|[[Ruined Desert Blocks]]<br />[[File:RuinedDesertBlocks.png|70px|link=Ruined Desert Blocks]] |
||
|} |
|} |
||
| − | |||
==='''Potted Tactus'''=== |
==='''Potted Tactus'''=== |
||
| Line 50: | Line 56: | ||
|[[Potted Tactus]]<br />[[File:PottedTactus.png|70px|link=Potted Tactus]] |
|[[Potted Tactus]]<br />[[File:PottedTactus.png|70px|link=Potted Tactus]] |
||
|} |
|} |
||
| − | |||
==='''Ruined Desert Column'''=== |
==='''Ruined Desert Column'''=== |
||
| Line 64: | Line 69: | ||
|[[Ruined Desert Column]]<br />[[File:RuinedDesertColumn.png|70px|link=Ruined Desert Column]] |
|[[Ruined Desert Column]]<br />[[File:RuinedDesertColumn.png|70px|link=Ruined Desert Column]] |
||
|} |
|} |
||
| − | |||
==='''Cocoa Slime Lamp'''=== |
==='''Cocoa Slime Lamp'''=== |
||
| Line 78: | Line 82: | ||
|[[Cocoa Slime Lamp]]<br />[[File:CocoaSlimeLamp.png|70px|link=Cocoa Slime Lamp]] |
|[[Cocoa Slime Lamp]]<br />[[File:CocoaSlimeLamp.png|70px|link=Cocoa Slime Lamp]] |
||
|} |
|} |
||
| − | |||
==='''Coil Grass'''=== |
==='''Coil Grass'''=== |
||
| Line 92: | Line 95: | ||
|[[Coil Grass]]<br />[[File:CoilGrass.png|70px|link=Coil Grass]] |
|[[Coil Grass]]<br />[[File:CoilGrass.png|70px|link=Coil Grass]] |
||
|} |
|} |
||
| − | |||
==='''Berry Slime Lamp'''=== |
==='''Berry Slime Lamp'''=== |
||
| Line 106: | Line 108: | ||
|[[Berry Slime Lamp]]<br />[[File:BerrySlimeLamp.png|70px|link=Berry Slime Lamp]] |
|[[Berry Slime Lamp]]<br />[[File:BerrySlimeLamp.png|70px|link=Berry Slime Lamp]] |
||
|} |
|} |
||
| − | |||
==Purple Pods (Treasure Cracker MK III)== |
==Purple Pods (Treasure Cracker MK III)== |
||
| Line 121: | Line 122: | ||
|[[Berry Teleporter]]<br />[[File:IconGadgetTeleportBerry.png|70px|link=Berry Teleporter]] |
|[[Berry Teleporter]]<br />[[File:IconGadgetTeleportBerry.png|70px|link=Berry Teleporter]] |
||
|} |
|} |
||
| − | |||
==='''Master Apiary'''=== |
==='''Master Apiary'''=== |
||
| Line 135: | Line 135: | ||
|[[Master Apiary]]<br />[[File:MasterApiary SP.png|70px|link=Master Apiary]] |
|[[Master Apiary]]<br />[[File:MasterApiary SP.png|70px|link=Master Apiary]] |
||
|} |
|} |
||
| − | |||
==='''Gold Plorts'''=== |
==='''Gold Plorts'''=== |
||
| Line 149: | Line 148: | ||
|[[Gold Slime|Gold Plort]]<br />[[File:PlortGOLD.png|70px|link=Plorts]] x3 |
|[[Gold Slime|Gold Plort]]<br />[[File:PlortGOLD.png|70px|link=Plorts]] x3 |
||
|} |
|} |
||
| − | |||
==='''Palm Sprout'''=== |
==='''Palm Sprout'''=== |
||
| Line 163: | Line 161: | ||
|[[Palm Sprout]]<br />[[File:Palm Sprout.png|70px|link=Palm Sprout]] |
|[[Palm Sprout]]<br />[[File:Palm Sprout.png|70px|link=Palm Sprout]] |
||
|} |
|} |
||
| − | |||
==='''Palm Tree'''=== |
==='''Palm Tree'''=== |
||
| Line 177: | Line 174: | ||
|[[Palm Tree]]<br />[[File:Palm Tree Image.png|70px|link=Palm Tree]] |
|[[Palm Tree]]<br />[[File:Palm Tree Image.png|70px|link=Palm Tree]] |
||
|} |
|} |
||
| − | |||
==='''Cocoa Warp Depot'''=== |
==='''Cocoa Warp Depot'''=== |
||
| Line 191: | Line 187: | ||
|[[Cocoa Warp Depot]]<br />[[File:IconGadgetWarpDepotCocoa.png|70px|link=Cocoa Warp Depot]] |
|[[Cocoa Warp Depot]]<br />[[File:IconGadgetWarpDepotCocoa.png|70px|link=Cocoa Warp Depot]] |
||
|} |
|} |
||
| − | |||
==='''Super Hydro Turret'''=== |
==='''Super Hydro Turret'''=== |
||
| Line 205: | Line 200: | ||
|[[Super Hydro Turret]]<br />[[File:SuperHydroTurret.png|70px|link=Super Hydro Turret]] |
|[[Super Hydro Turret]]<br />[[File:SuperHydroTurret.png|70px|link=Super Hydro Turret]] |
||
|} |
|} |
||
| − | |||
==='''Master Drill'''=== |
==='''Master Drill'''=== |
||
| Line 219: | Line 213: | ||
|[[Master Drill]]<br />[[File:MasterDrill SP.png|70px|link=Master Drill]] |
|[[Master Drill]]<br />[[File:MasterDrill SP.png|70px|link=Master Drill]] |
||
|} |
|} |
||
| − | |||
==='''Gold Plorts'''=== |
==='''Gold Plorts'''=== |
||
| Line 233: | Line 226: | ||
|[[Gold Slime|Gold Plort]]<br />[[File:PlortGOLD.png|70px|link=Plorts]] x3 |
|[[Gold Slime|Gold Plort]]<br />[[File:PlortGOLD.png|70px|link=Plorts]] x3 |
||
|} |
|} |
||
| − | |||
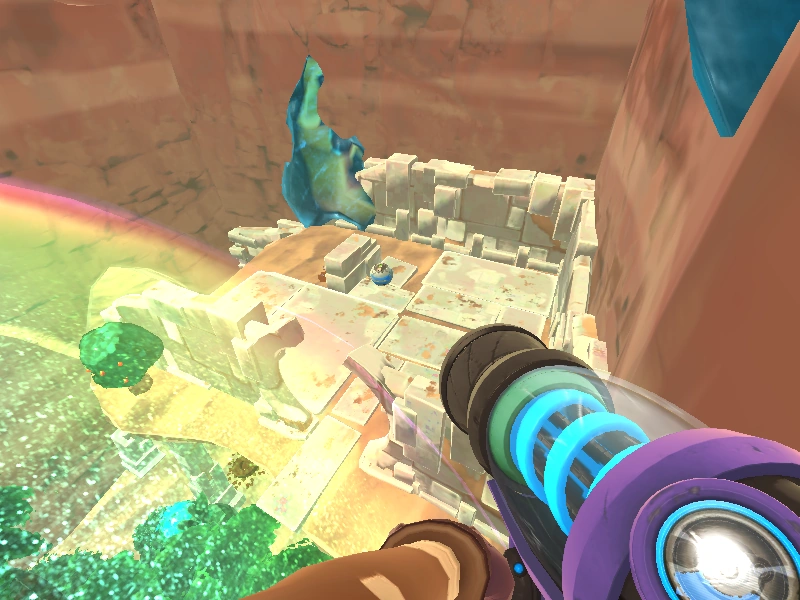
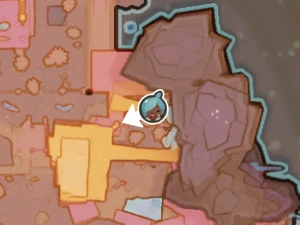
==='''Fiery Glass Sculpture'''=== |
==='''Fiery Glass Sculpture'''=== |
||
| Line 247: | Line 239: | ||
|[[Fiery Glass Sculpture]]<br />[[File:Fiery Glass Sculpture.png|70px|link=Fiery Glass Sculpture]] |
|[[Fiery Glass Sculpture]]<br />[[File:Fiery Glass Sculpture.png|70px|link=Fiery Glass Sculpture]] |
||
|} |
|} |
||
| − | |||
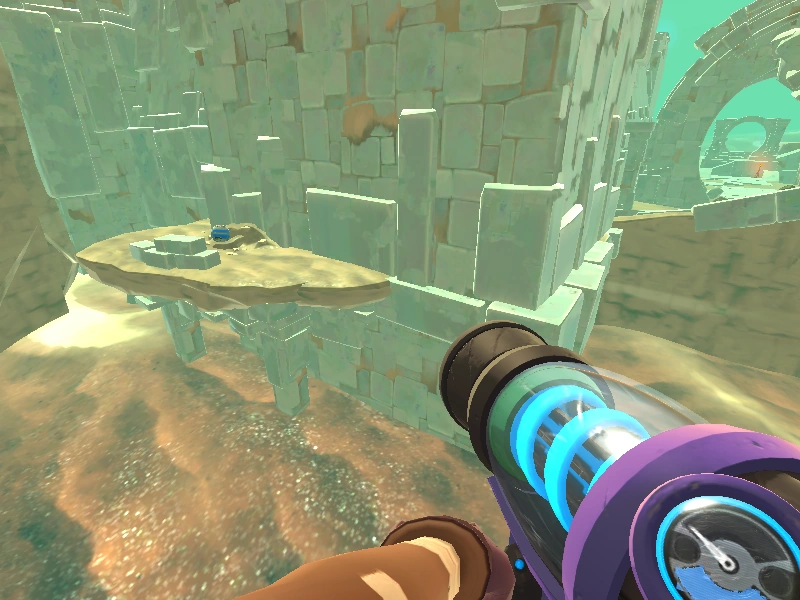
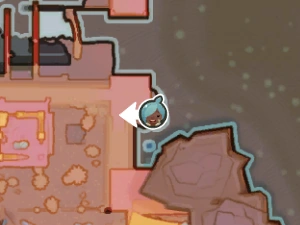
==='''Thundering Glass Sculpture'''=== |
==='''Thundering Glass Sculpture'''=== |
||
| Line 261: | Line 252: | ||
|[[Thundering Glass Sculpture]]<br />[[File:Thundering Glass Sculpture.png|70px|link=Thundering Glass Sculpture]] |
|[[Thundering Glass Sculpture]]<br />[[File:Thundering Glass Sculpture.png|70px|link=Thundering Glass Sculpture]] |
||
|} |
|} |
||
| − | |||
==='''Cocoa Teleporter'''=== |
==='''Cocoa Teleporter'''=== |
||
| Line 275: | Line 265: | ||
|[[Cocoa Teleporter]]<br />[[File:IconGadgetTeleportCocoa.png|70px|link=Cocoa Teleporter]] |
|[[Cocoa Teleporter]]<br />[[File:IconGadgetTeleportCocoa.png|70px|link=Cocoa Teleporter]] |
||
|} |
|} |
||
| − | |||
==='''Master Pump'''=== |
==='''Master Pump'''=== |
||
| Line 289: | Line 278: | ||
|[[Master Pump]]<br />[[File:MasterPump SP.png|70px|link=Master Pump]] |
|[[Master Pump]]<br />[[File:MasterPump SP.png|70px|link=Master Pump]] |
||
|} |
|} |
||
| − | |||
==='''Berry Warp Depot'''=== |
==='''Berry Warp Depot'''=== |
||
| Line 304: | Line 292: | ||
|} |
|} |
||
| ⚫ | |||
| − | |||
| ⚫ | |||
{| class="article-table" style="text-align: center; font-size: 90%; line-height: 1em; width: 95%; margin: 1em auto 1em auto;" |
{| class="article-table" style="text-align: center; font-size: 90%; line-height: 1em; width: 95%; margin: 1em auto 1em auto;" |
||
|+ |
|+ |
||
| Line 318: | Line 305: | ||
|} |
|} |
||
| + | ==Secret Style Paid DLC== |
||
| + | ==='''Fire Slime'''=== |
||
| + | {| class="article-table" style="text-align: center; font-size: 90%; line-height: 1em; width: 95%; margin: 1em auto 1em auto;" |
||
| + | |+ |
||
| + | |- |
||
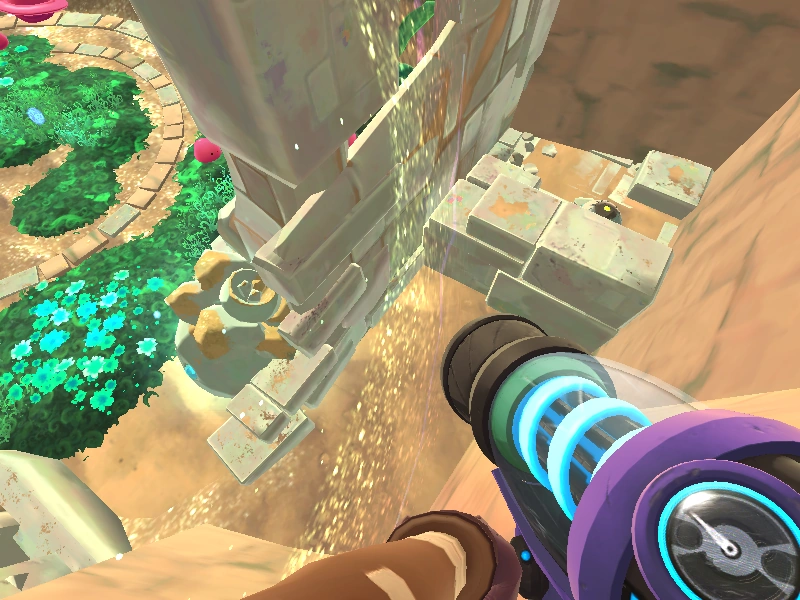
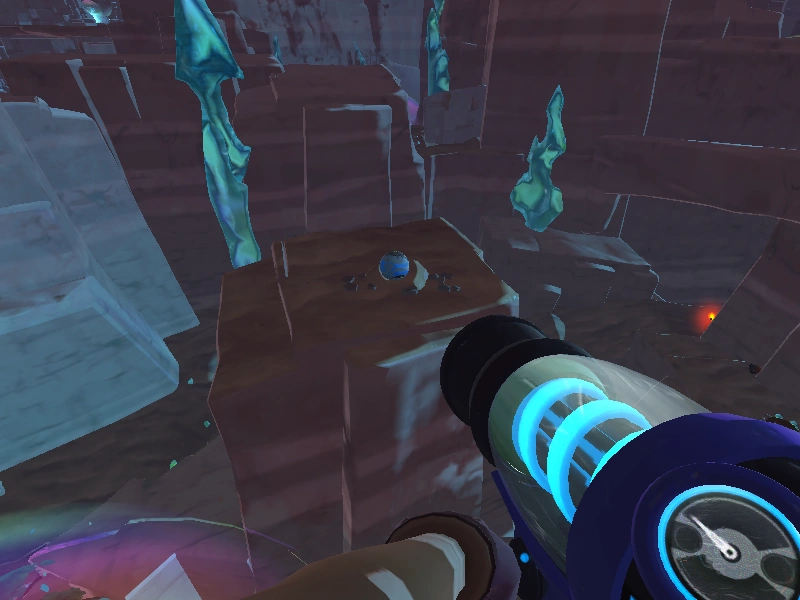
| + | !<center>In-game</center> |
||
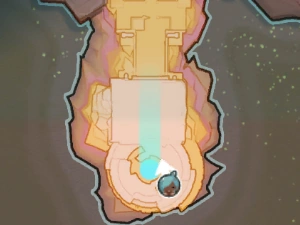
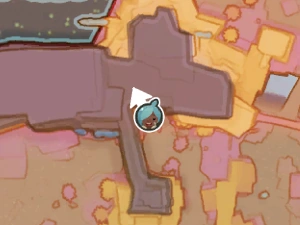
| + | !<center>Map</center> |
||
| + | !<center>Loot</center> |
||
| + | |- |
||
| ⚫ | |||
| + | |[[File:SecretStyleFireMap.png|150px]] |
||
| + | |[[Secret Style Pack|Devilish]] |
||
| + | [[File:Fire Slime SecretStyle SP.png|70px|link=Secret Style Pack]] |
||
| + | |} |
||
| + | |||
| + | ==='''Dervish Slime'''=== |
||
| + | {| class="article-table" style="text-align: center; font-size: 90%; line-height: 1em; width: 95%; margin: 1em auto 1em auto;" |
||
| + | |+ |
||
| + | |- |
||
| + | !<center>In-game</center> |
||
| + | !<center>Map</center> |
||
| + | !<center>Loot</center> |
||
| + | |- |
||
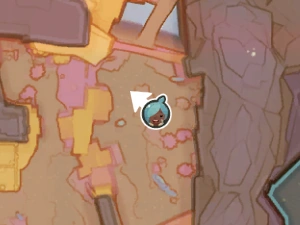
| + | |[[File:SecretStyleDervishPod.png|200px]] |
||
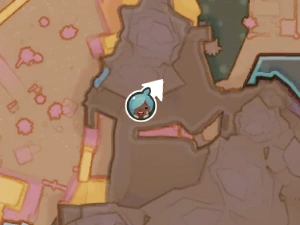
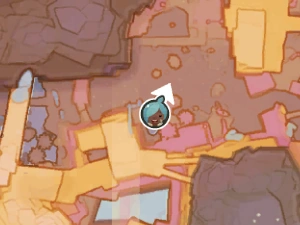
| + | |[[File:SecretStyleDervishMap.png|150px]] |
||
| + | |[[Secret Style Pack|Nebula]] |
||
| + | [[File:Dervish Slime SecretStyle SP.png|70px|link=Secret Style Pack]] |
||
| + | |} |
||
| + | |||
| + | ==='''Tangle Slime'''=== |
||
| + | {| class="article-table" style="text-align: center; font-size: 90%; line-height: 1em; width: 95%; margin: 1em auto 1em auto;" |
||
| + | |+ |
||
| + | |- |
||
| + | !<center>In-game</center> |
||
| + | !<center>Map</center> |
||
| + | !<center>Loot</center> |
||
| + | |- |
||
| + | |[[File:SecretStyleTanglePod.png|200px]] |
||
| + | |[[File:SecretStyleTangleMap.png|150px]] |
||
| + | |[[Secret Style Pack|Nightshade]] |
||
| + | [[File:Tangle Slime SecretStyle SP.png|70px|link=Secret Style Pack]] |
||
| + | |} |
||
| + | |||
| + | ==='''Mosaic Slime'''=== |
||
| + | {| class="article-table" style="text-align: center; font-size: 90%; line-height: 1em; width: 95%; margin: 1em auto 1em auto;" |
||
| + | |+ |
||
| + | |- |
||
| + | !<center>In-game</center> |
||
| + | !<center>Map</center> |
||
| + | !<center>Loot</center> |
||
| + | |- |
||
| + | |[[File:SecretStyleMosaicPod.png|200px]] |
||
| + | |[[File:SecretStyleMosaicMap.png|150px]] |
||
| + | |[[Secret Style Pack|Shattered]] |
||
| + | [[File:Mosaic Slime SecretStyle SP.png|70px|link=Secret Style Pack]] |
||
| + | |} |
||
{{navbox}} |
{{navbox}} |
||
Revision as of 19:36, 2 July 2020
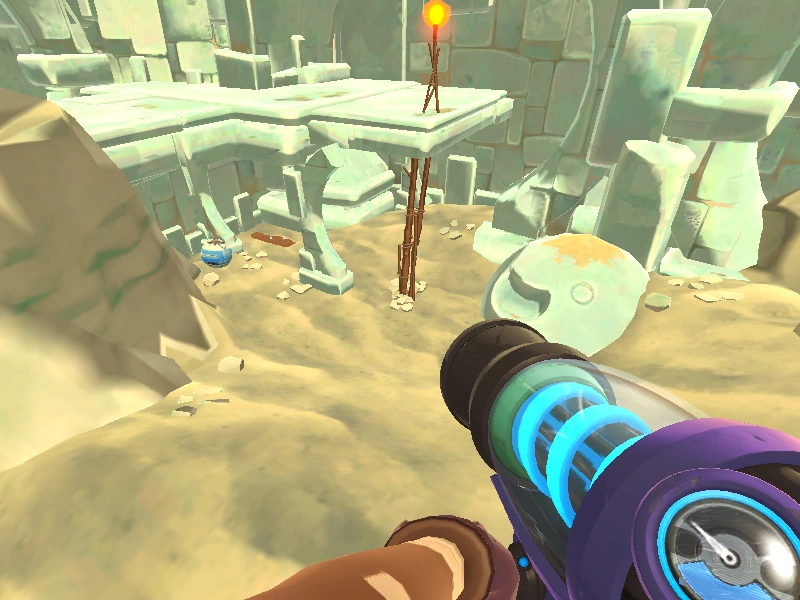
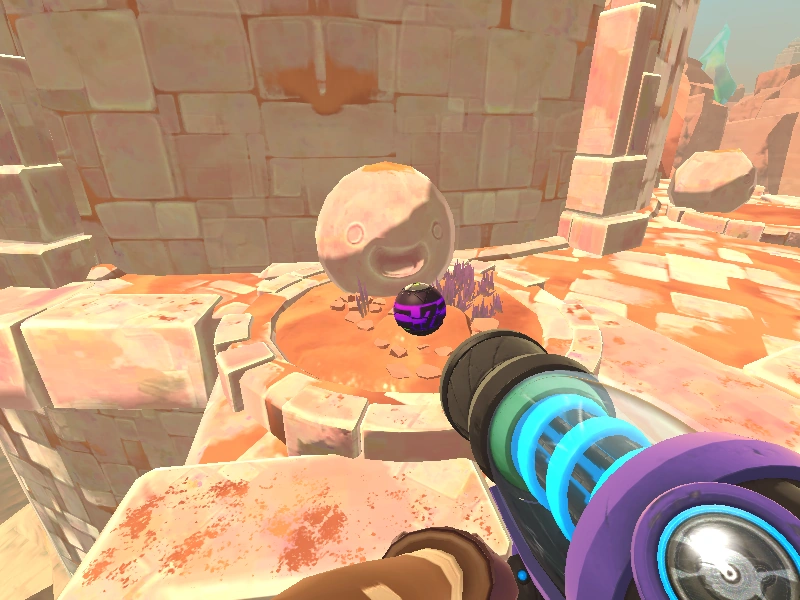
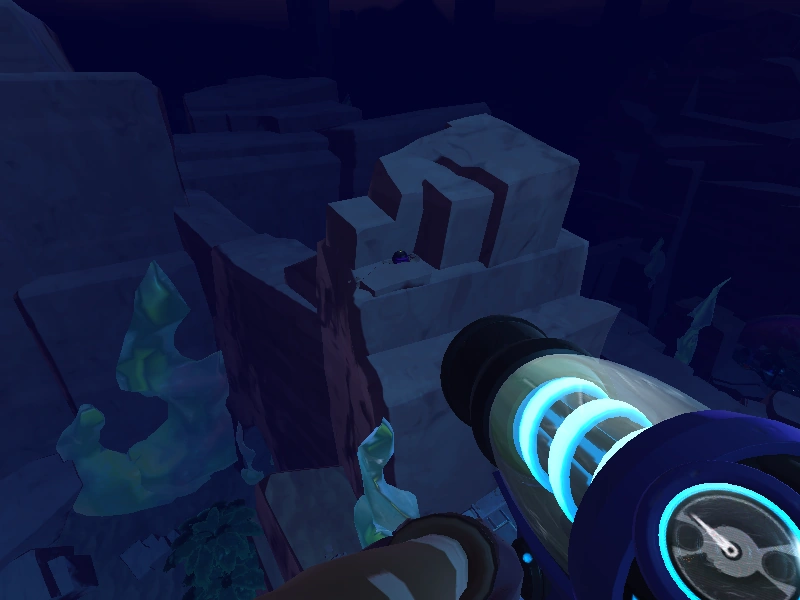
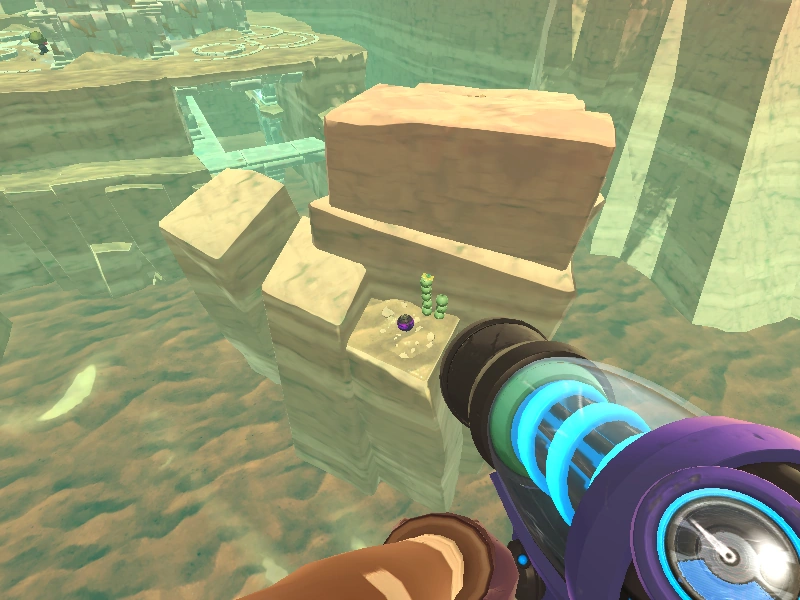
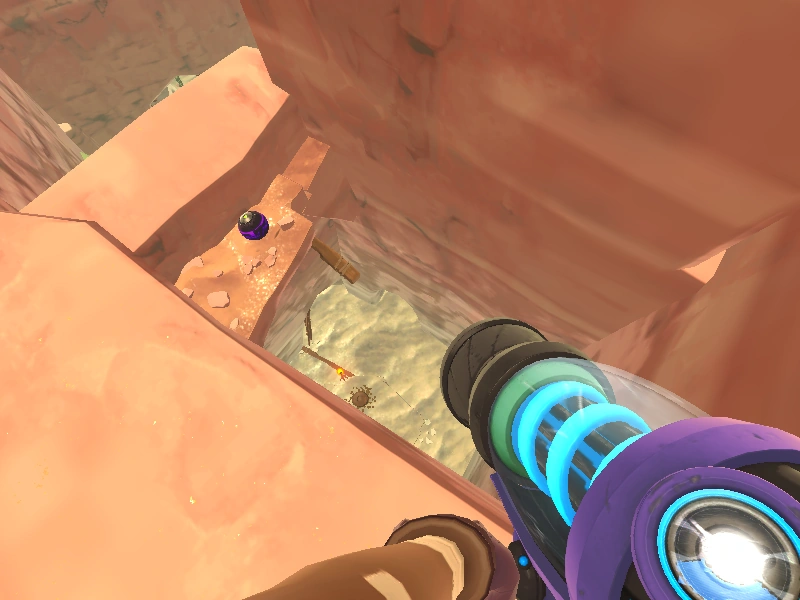
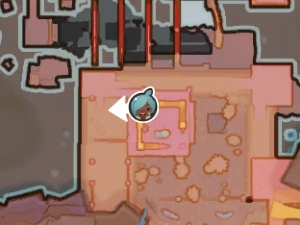
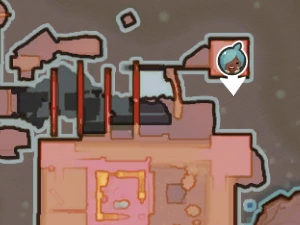
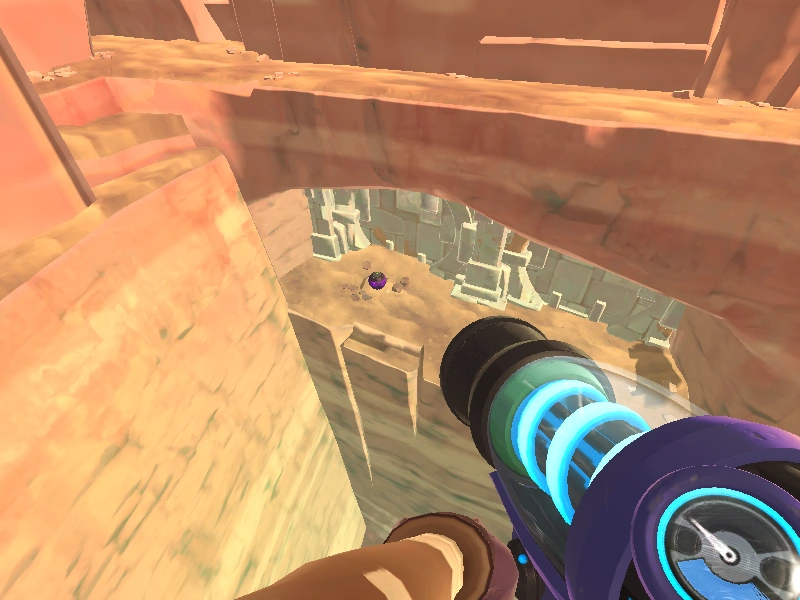
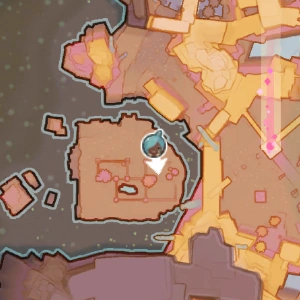
This page lists all of the available Treasure Pods in The Glass Desert. Before starting, it is recommended to activate The Glass Desert's Map Data Node to unlock terrain details on the World Map.
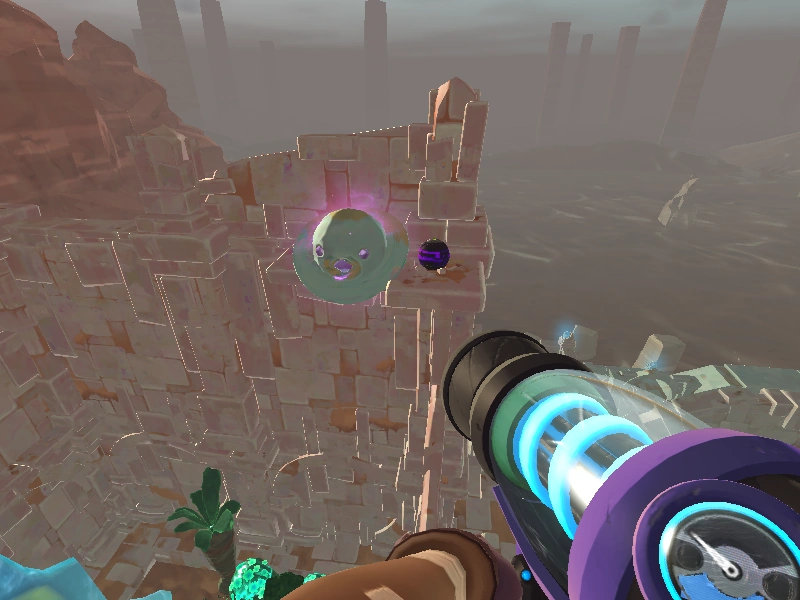
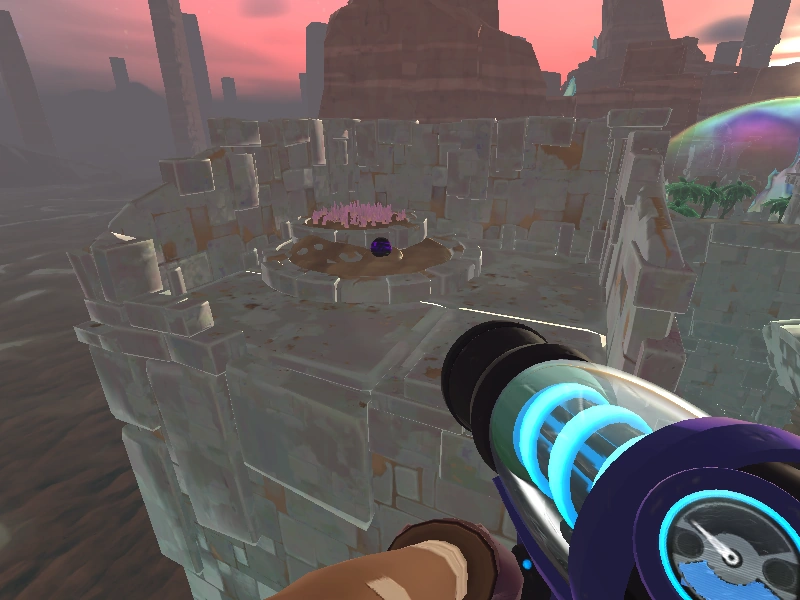
The Jetpack is necessary to find a majority of these Pods, as the terrain requires extensive use of it to navigate. Having fully upgraded Energy is also highly recommended, since some of these locations require extensive Jetpack usage to get to.
Additionally, there are no Green Treasure Pods in The Glass Desert, so the Treasure Cracker MK II is required to start opening them, however the Treasure Cracker MK III is recommended since almost all of them are purple pods.
Blue Pods (Treasure Cracker MK II)
Butterscotch Slime Lamp

|
|
Butterscotch Slime Lamp
|
Ruined Desert Blocks
|
|
Ruined Desert Blocks
|
Potted Tactus
|
|
Potted Tactus
|
Ruined Desert Column

|
|
Ruined Desert Column
|
Cocoa Slime Lamp
|
|
Cocoa Slime Lamp
|
Coil Grass
|
|
Coil Grass
|
Berry Slime Lamp
|
|
Berry Slime Lamp
|
Purple Pods (Treasure Cracker MK III)
Berry Teleporter
|
|
Berry Teleporter
|
Master Apiary
|
|
Master Apiary
|
Gold Plorts
|
|
Gold Plort x3 x3
|
Palm Sprout
|
|
Palm Sprout
|
Palm Tree
|
|
Palm Tree
|
Cocoa Warp Depot
|
|
Cocoa Warp Depot
|
Super Hydro Turret
|
|
Super Hydro Turret
|
Master Drill
|
|
Master Drill
|
Gold Plorts
|
|
Gold Plort x3
|
Fiery Glass Sculpture
|
|
Fiery Glass Sculpture
|
Thundering Glass Sculpture
|
|
Thundering Glass Sculpture
|
Cocoa Teleporter
|
|
Cocoa Teleporter
|
Master Pump
|
|
Master Pump
|
Berry Warp Depot

|
|
Berry Warp Depot
|
Towering Glass Sculpture
|
|
Towering Glass Sculpture
|
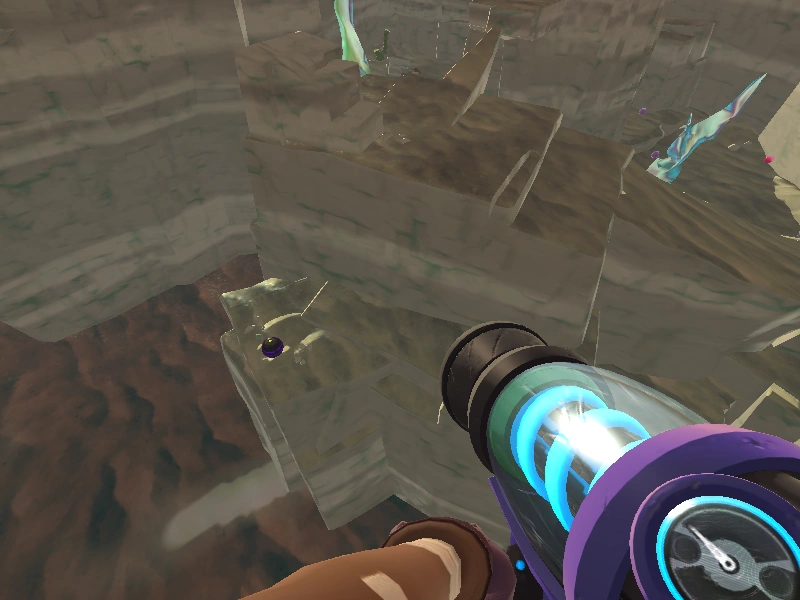
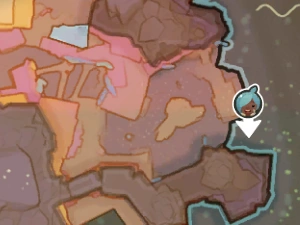
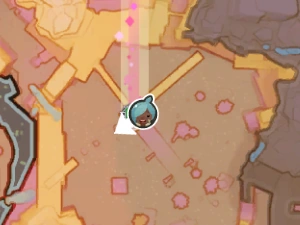
Secret Style Paid DLC
Fire Slime
|
|
Devilish
|

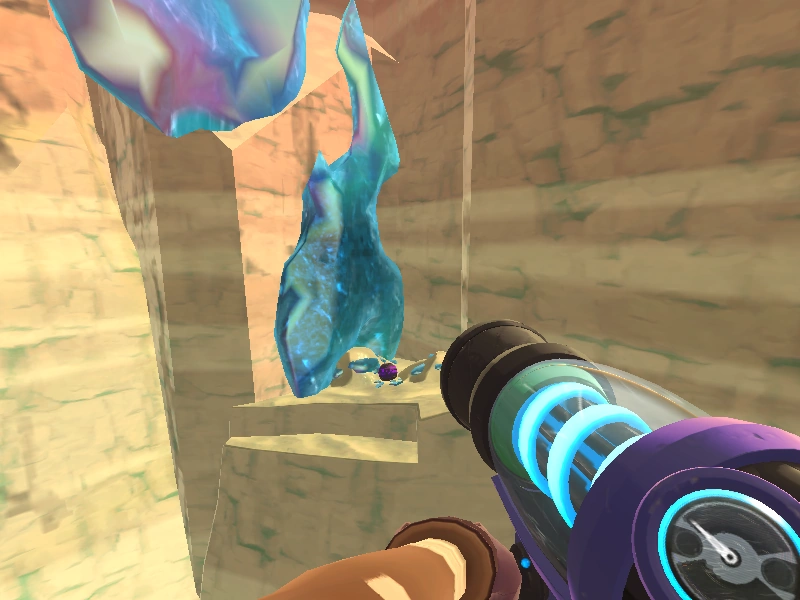
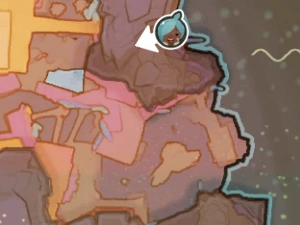
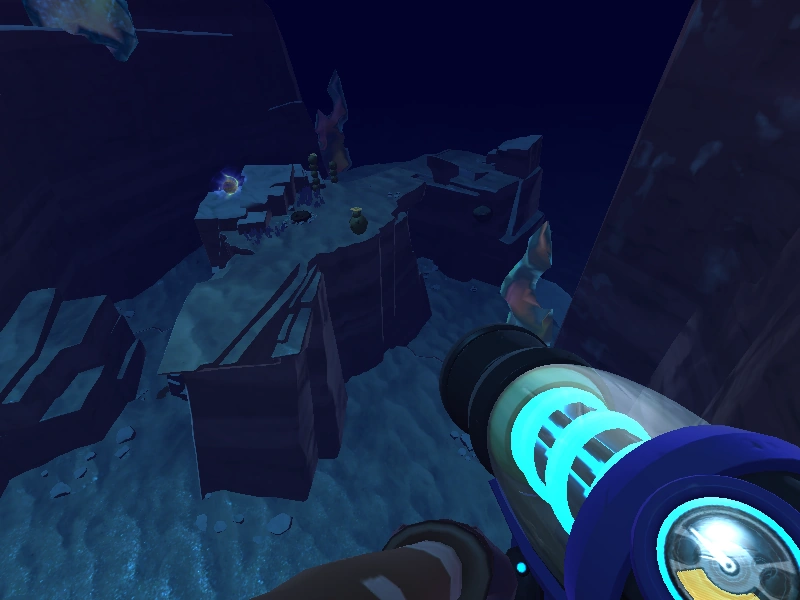
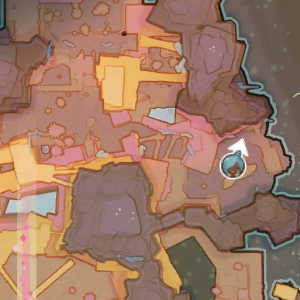
Dervish Slime
|
|
Nebula
|

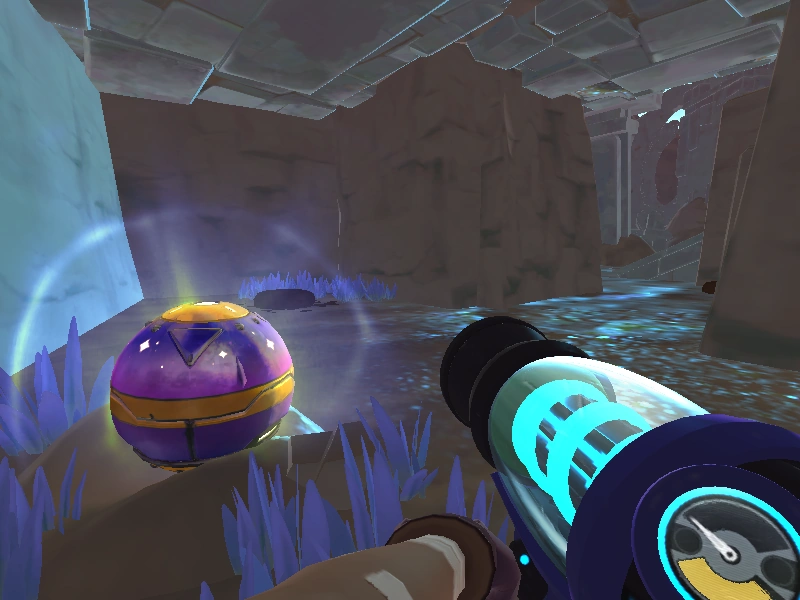
Tangle Slime
|
|
Nightshade
|

Mosaic Slime
|
|
Shattered
|
