No edit summary Tag: Visual edit |
mNo edit summary |
||
| (29 intermediate revisions by 4 users not shown) | |||
| Line 1: | Line 1: | ||
| + | {{GingerTabber}} |
||
| − | {{Under Construction}} __FORCETOC__ |
||
[[File:GildedGinger SP.png|right|250px]] |
[[File:GildedGinger SP.png|right|250px]] |
||
| − | {{GingerTabber}}<br> |
||
| − | This is a list of possible locations where the Gilded Ginger can spawn.<br /> |
||
| − | '''Note that this list may be incomplete.''' |
||
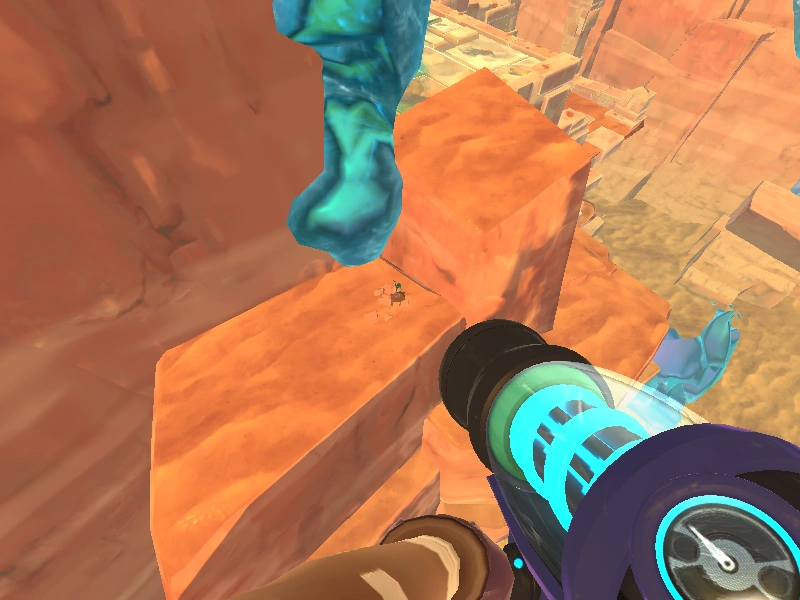
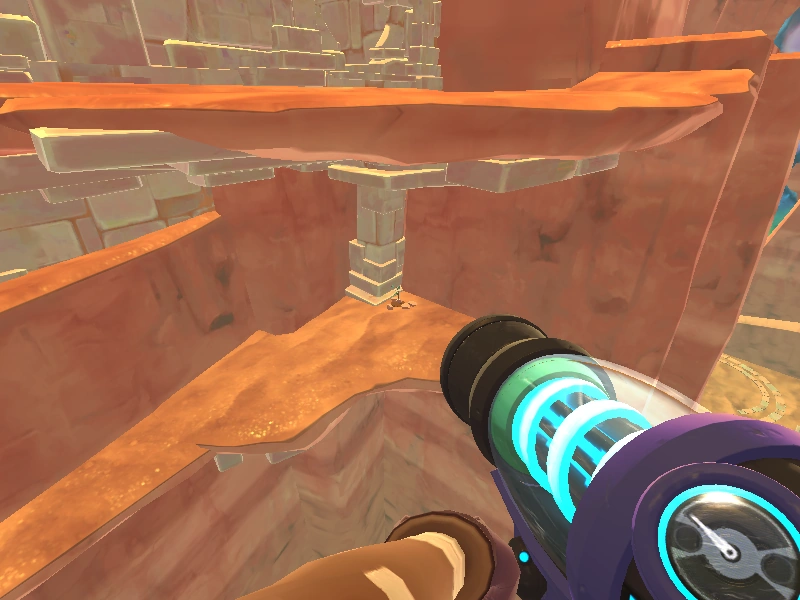
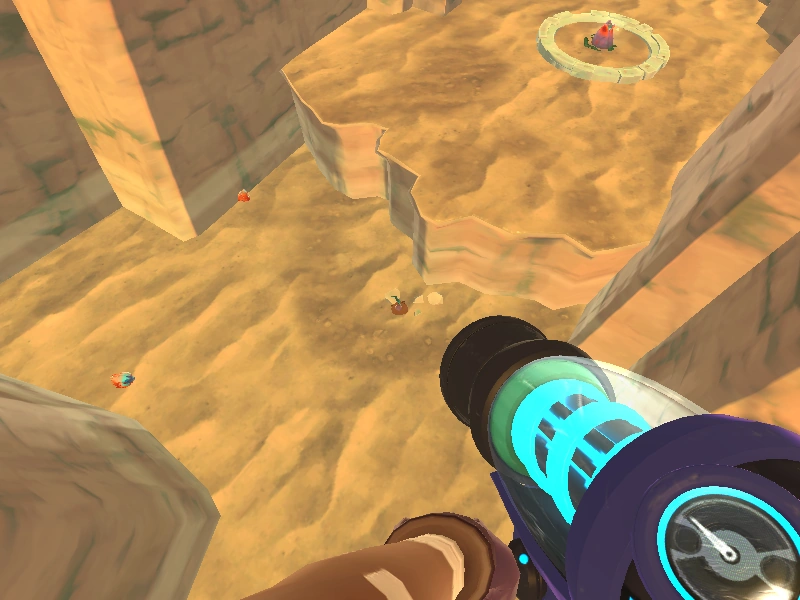
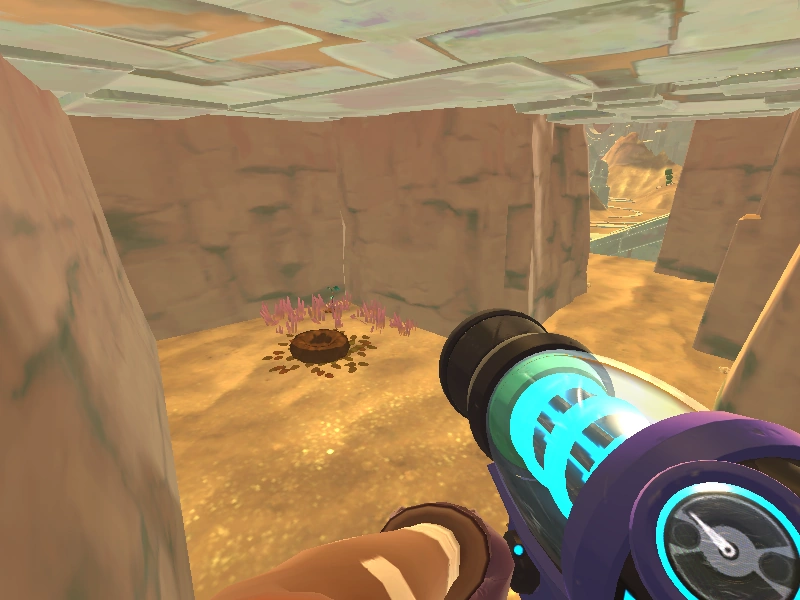
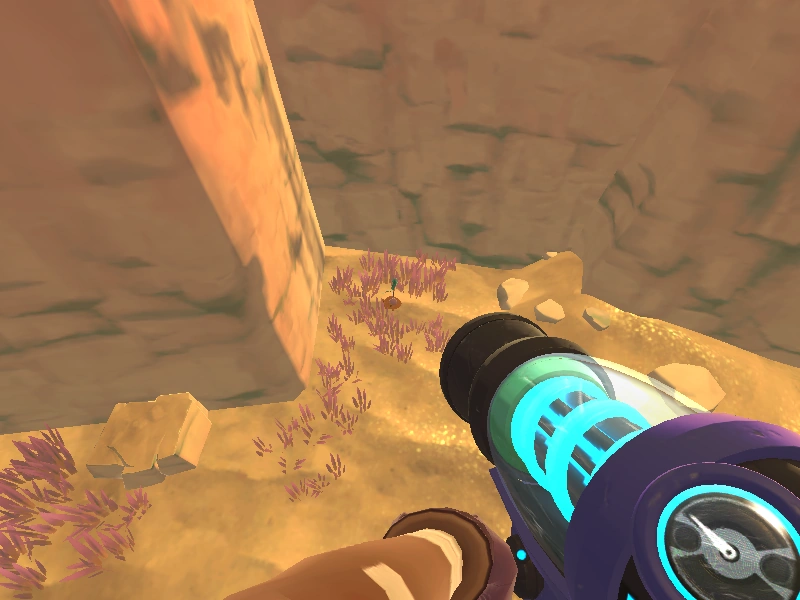
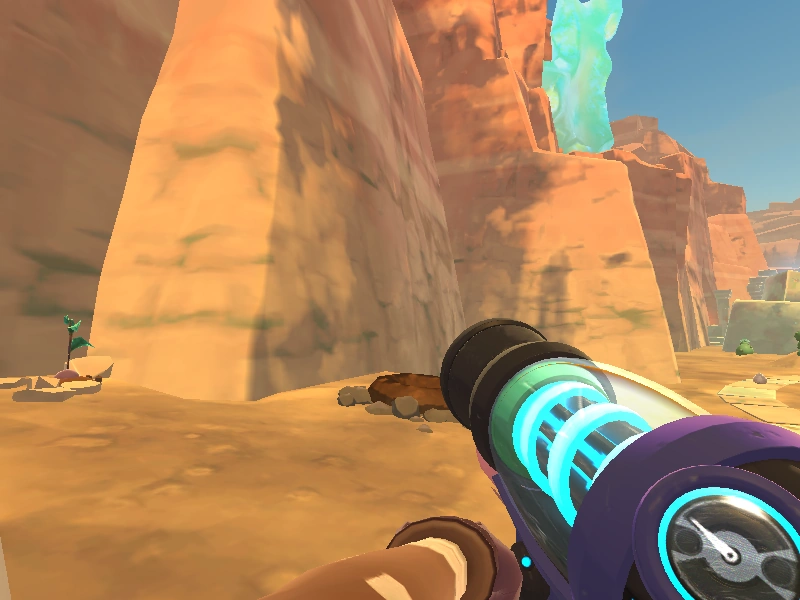
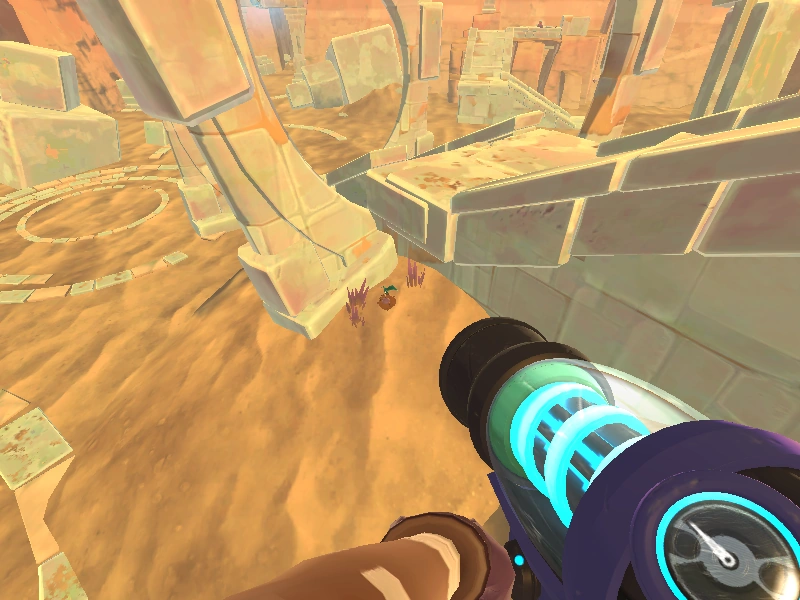
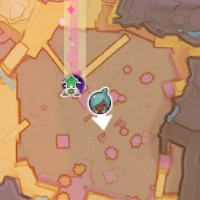
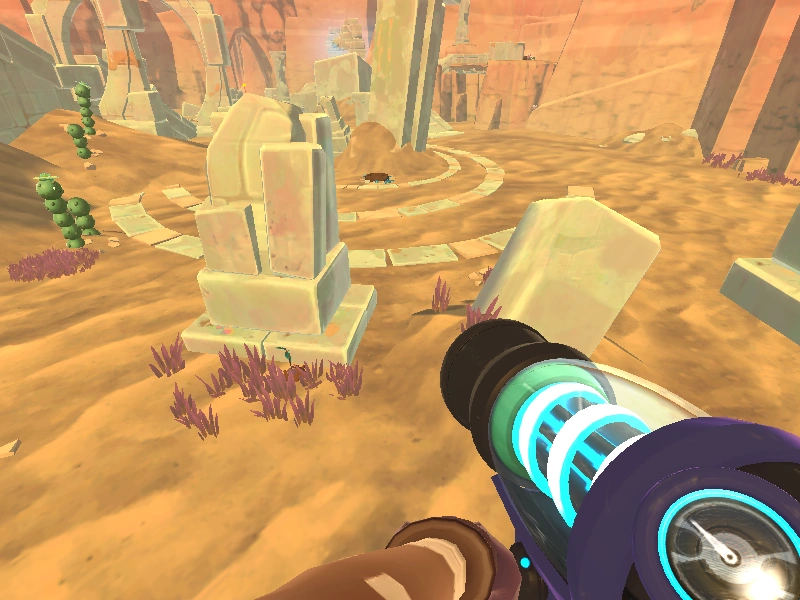
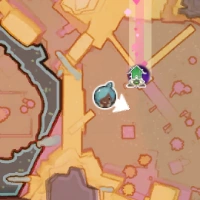
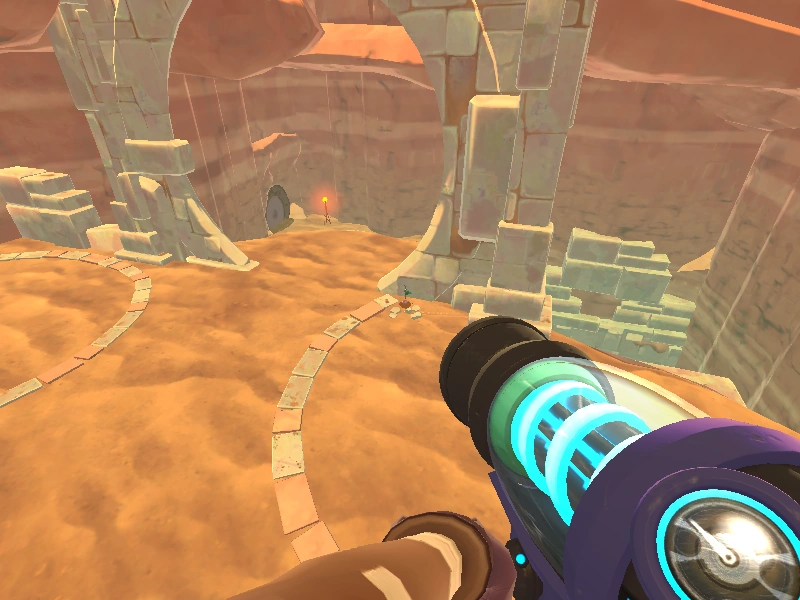
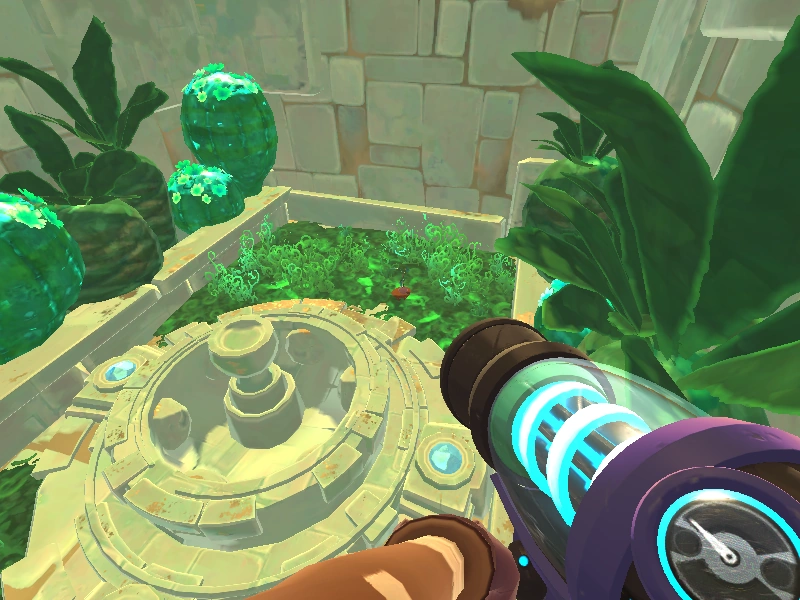
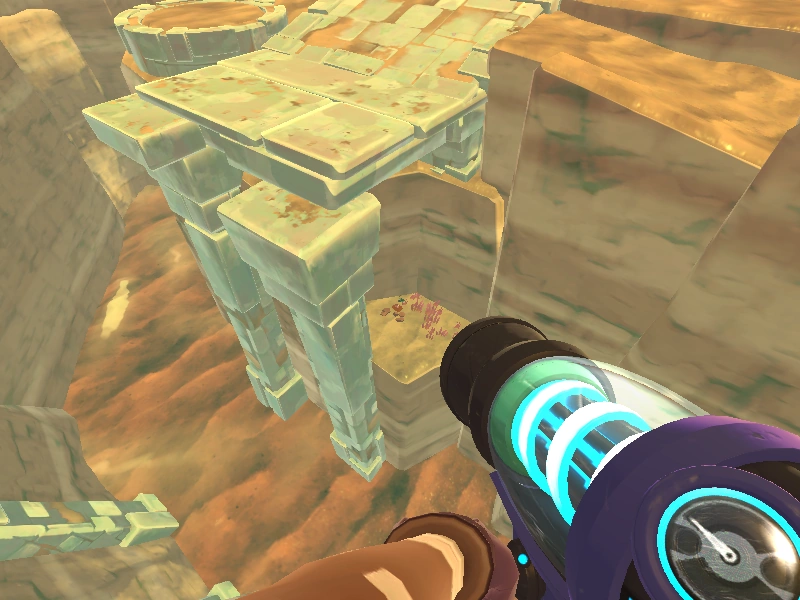
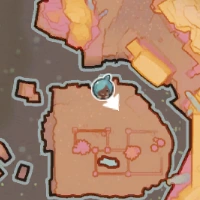
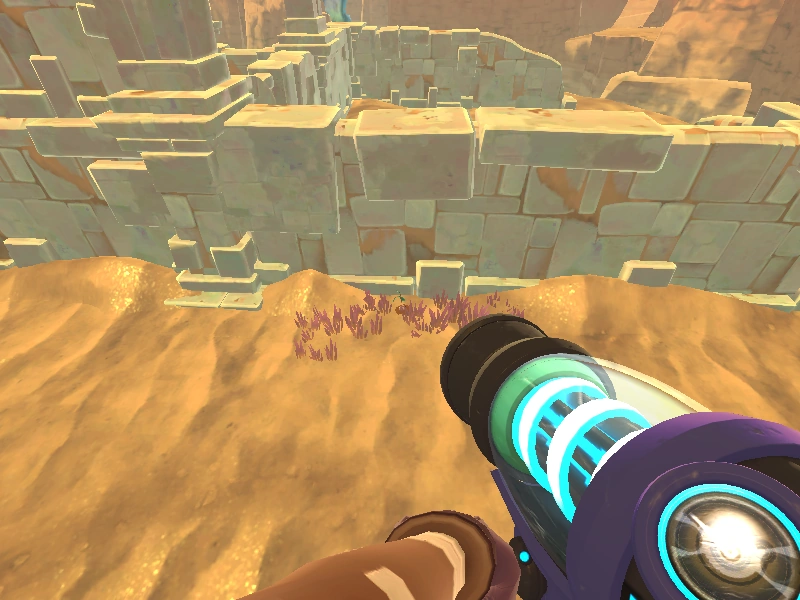
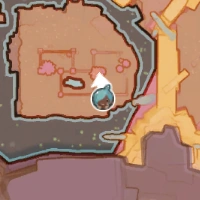
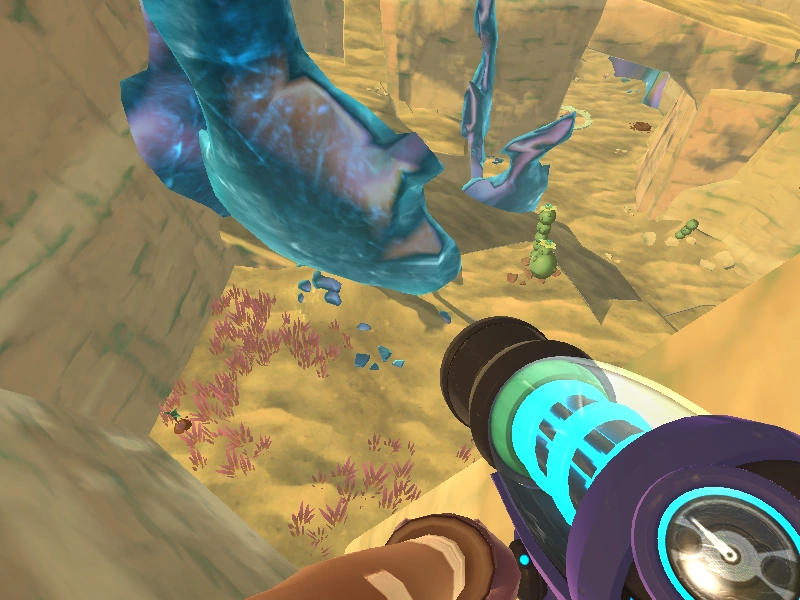
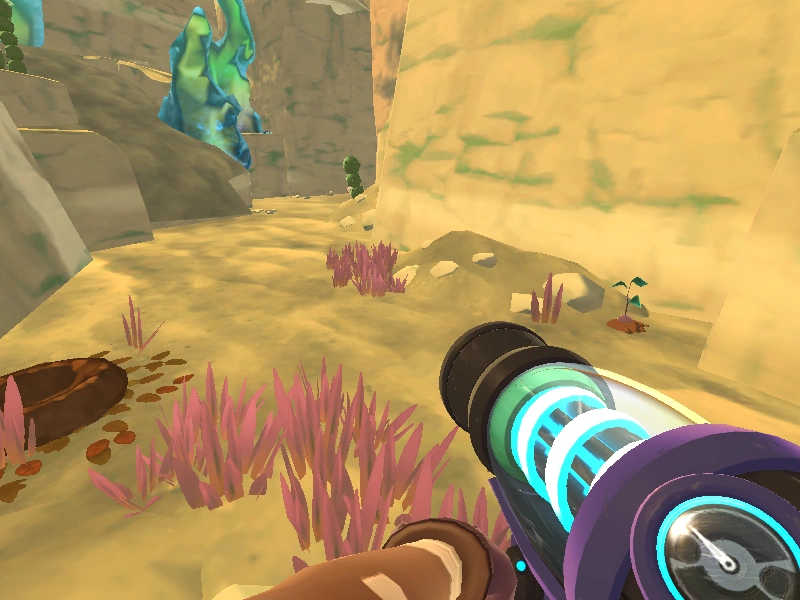
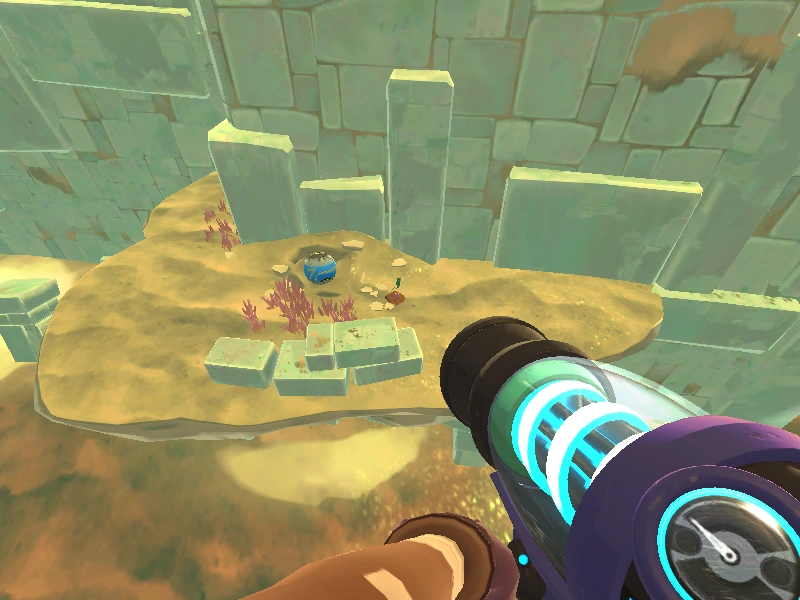
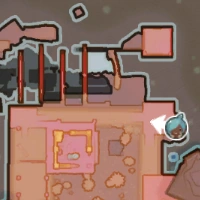
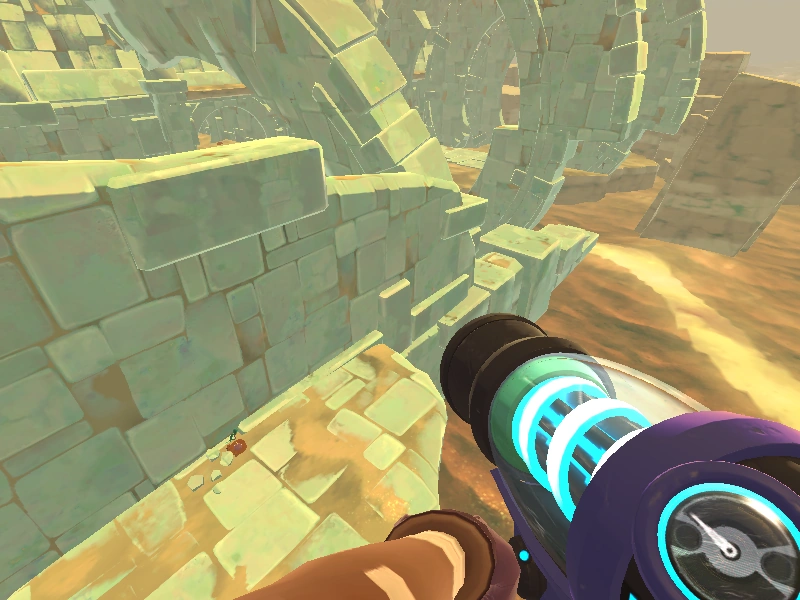
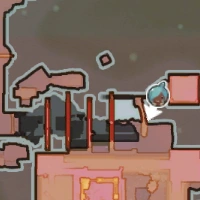
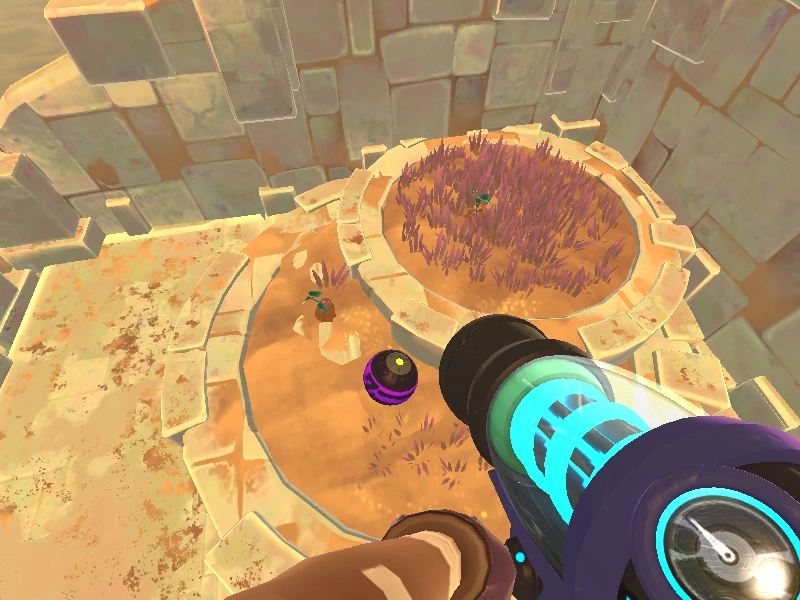
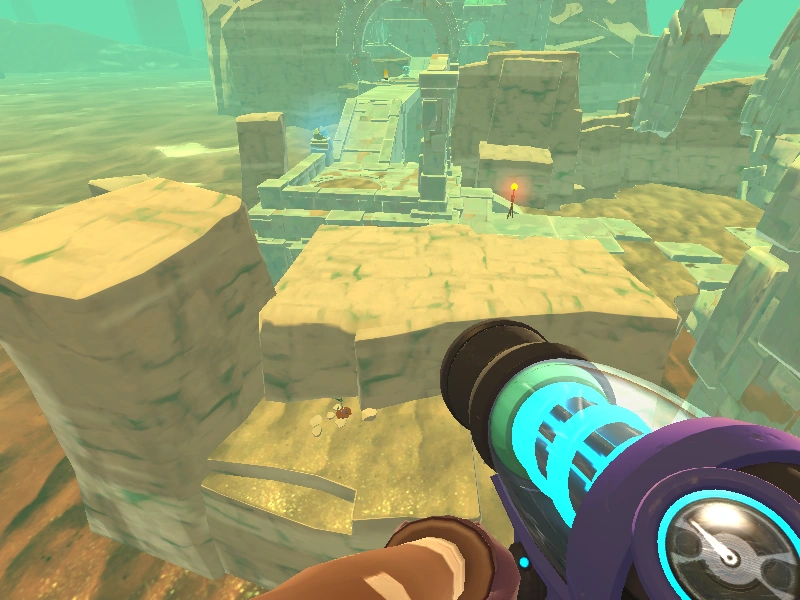
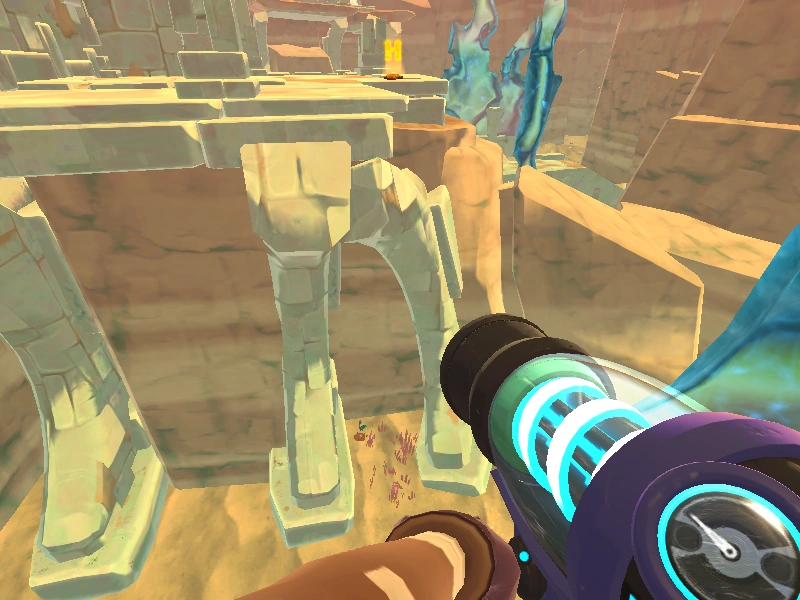
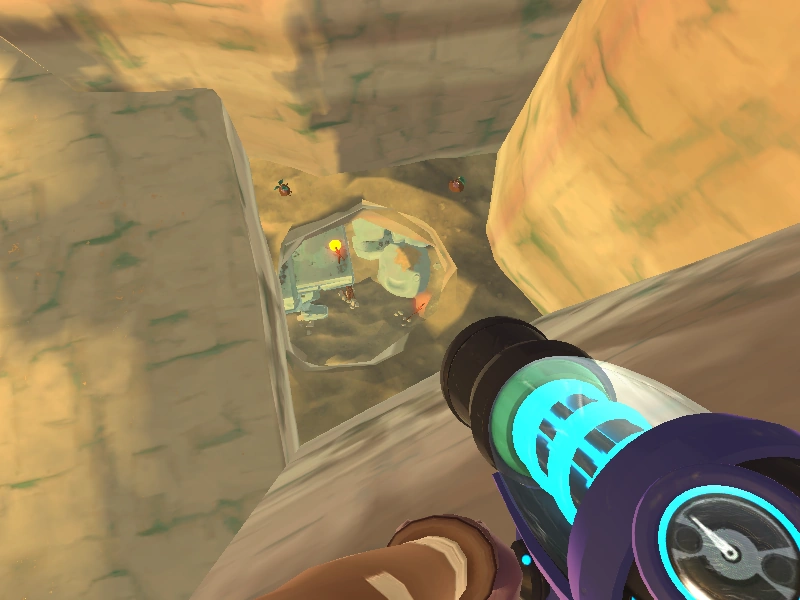
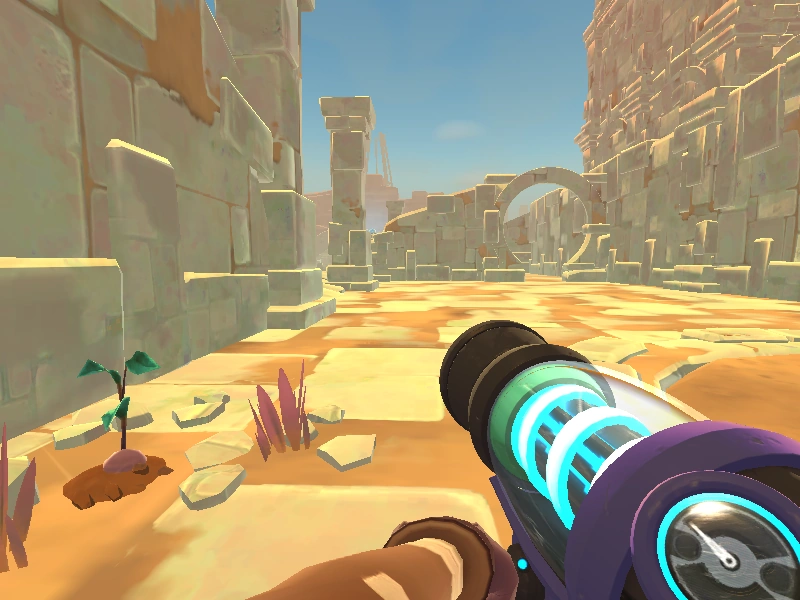
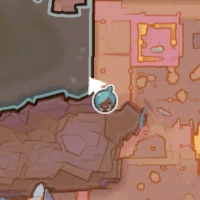
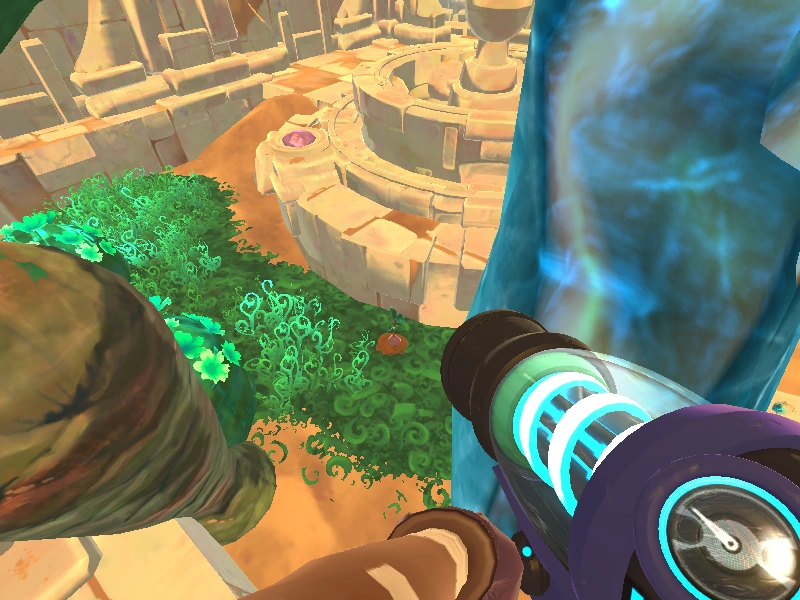
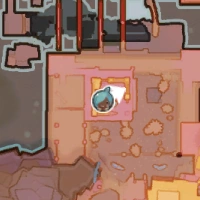
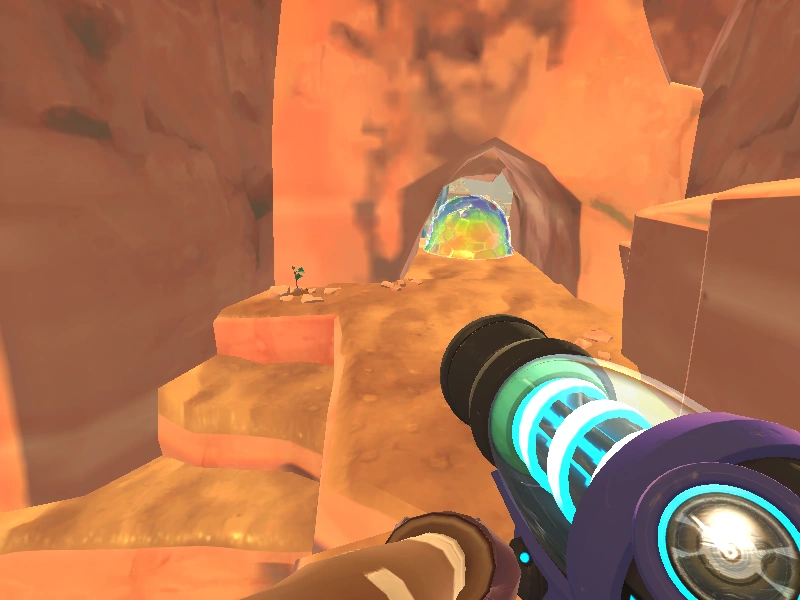
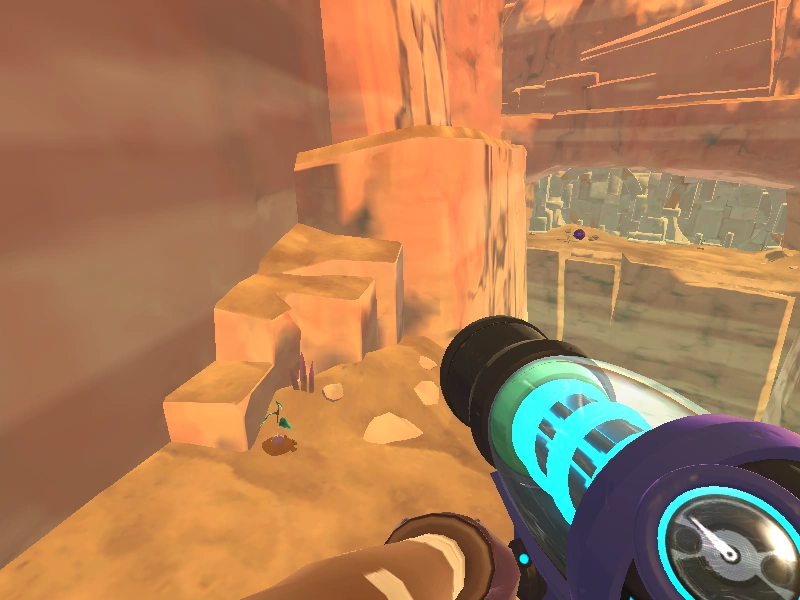
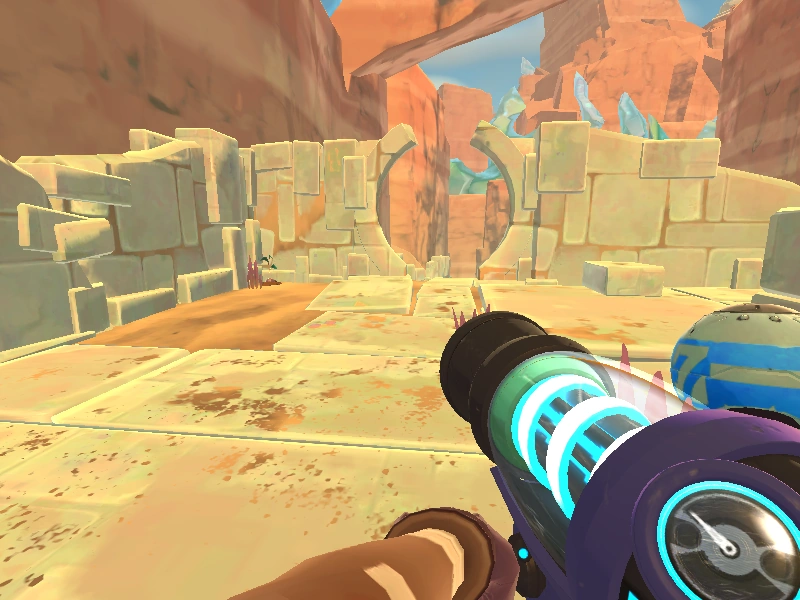
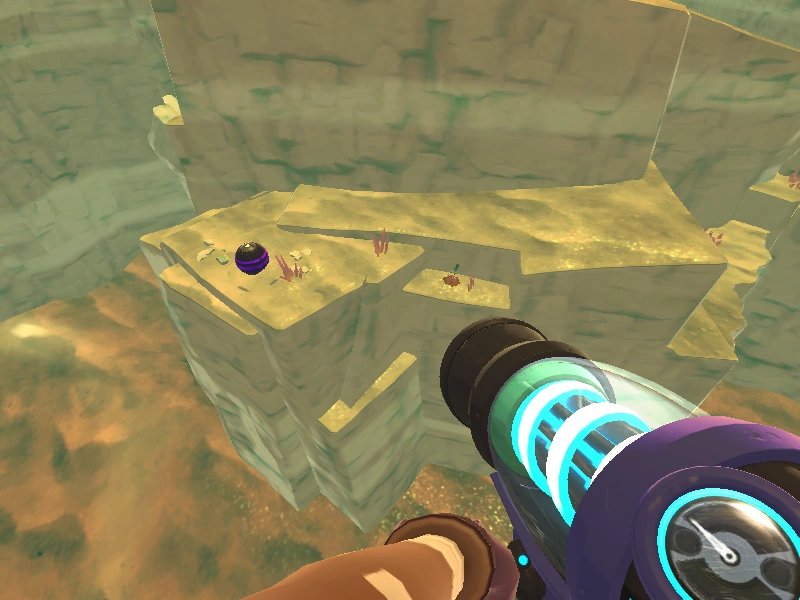
| + | Two '''Gilded Gingers''' can spawn in any of the 74 possible locations on a given day. |
||
| − | '''Note:''' If you encounter a Gilded Ginger that is not in the table below, please provide screenshots of the Ginger '''still in the ground''' or a GIF of it being harvested, along with a screenshot of the Map. If you do not know how to add to the table, leave your images in the comments below so someone else can. |
||
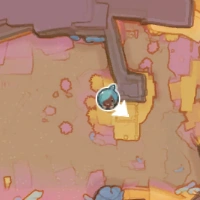
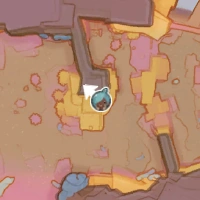
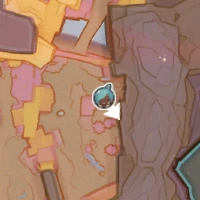
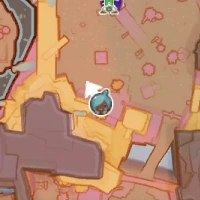
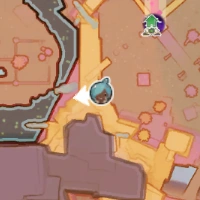
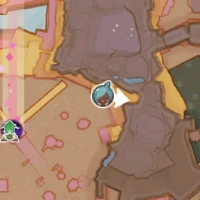
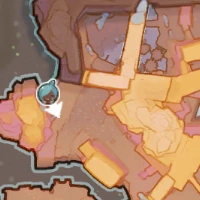
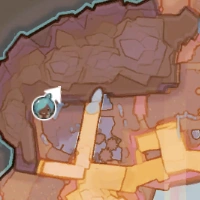
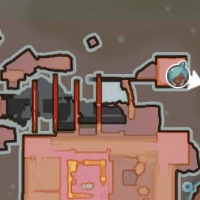
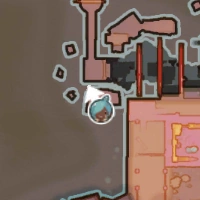
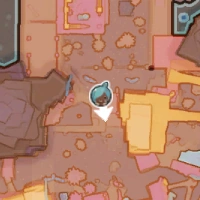
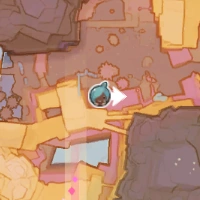
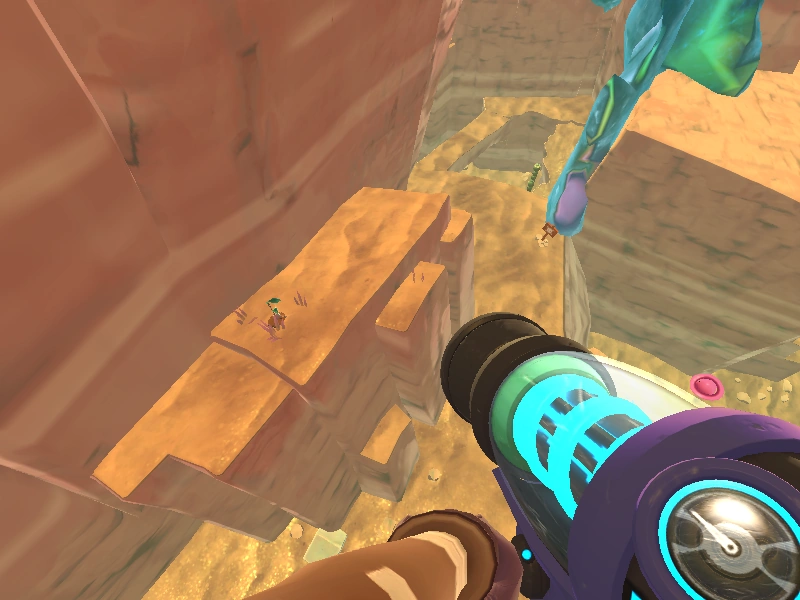
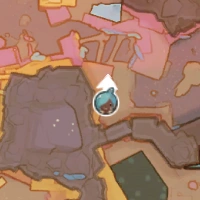
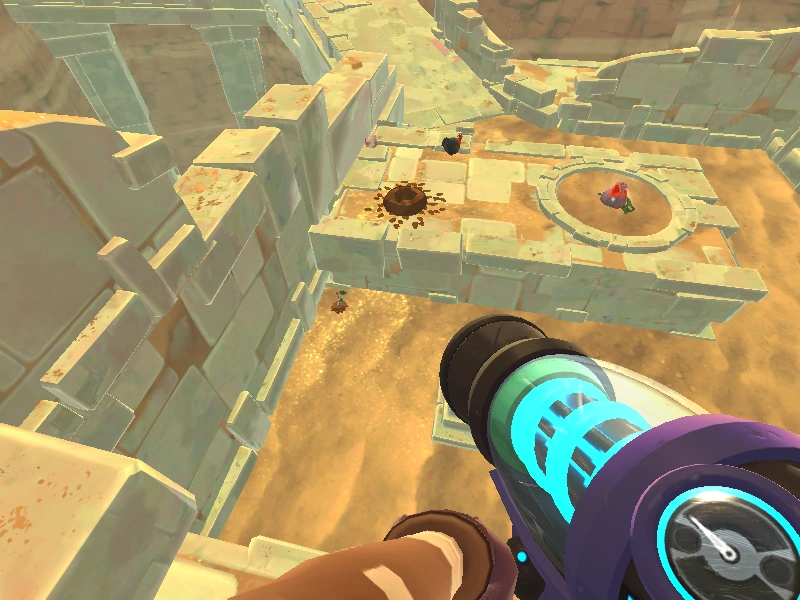
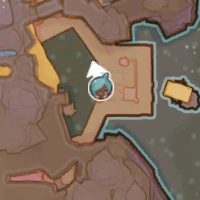
Since the in-game map is very simplistic prior to being unlocked using [[Map Data Nodes]] and this page uses fully-unlocked maps to pinpoint locations, it is recommended to activate the Desert's Map node first before proceeding. |
Since the in-game map is very simplistic prior to being unlocked using [[Map Data Nodes]] and this page uses fully-unlocked maps to pinpoint locations, it is recommended to activate the Desert's Map node first before proceeding. |
||
| + | Some images may have multiple ''Gilded Gingers'' to showcase that a single location has multiple spawn points. |
||
| − | ==Confirmed== |
||
| + | |||
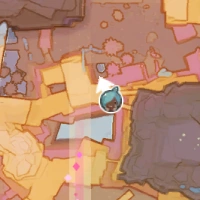
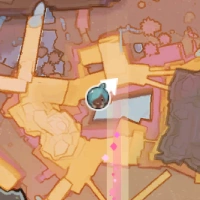
| + | ==Map== |
||
[[File:GildedGingerGD.png|thumb|300px|center]] |
[[File:GildedGingerGD.png|thumb|300px|center]] |
||
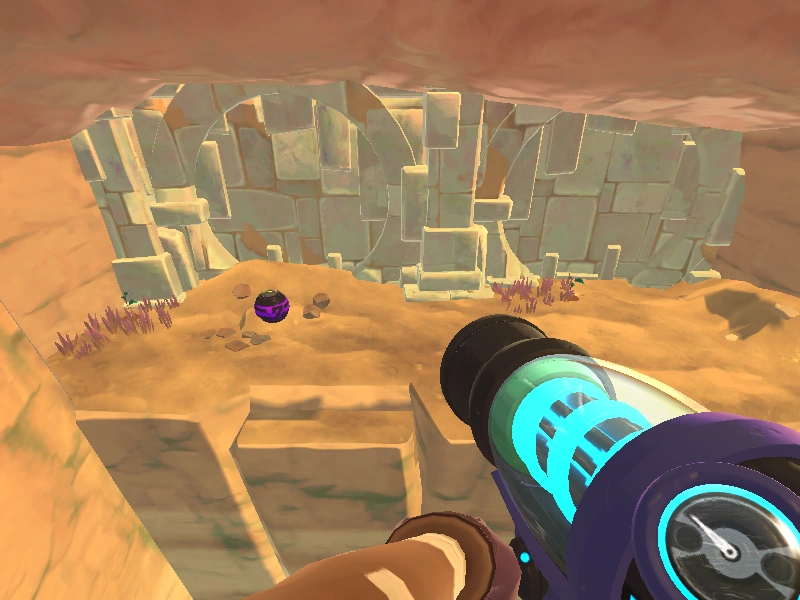
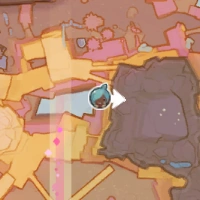
| + | ==Glass Desert entrance== |
||
| − | {| class="article-table" |
||
| + | {| class="article-table" align="center" |
||
|+ |
|+ |
||
|- |
|- |
||
| + | !<center>Number</center> |
||
!<center>In-game screenshot</center> |
!<center>In-game screenshot</center> |
||
!<center>Map</center> |
!<center>Map</center> |
||
| − | !<center>Additional notes</center> |
||
|- |
|- |
||
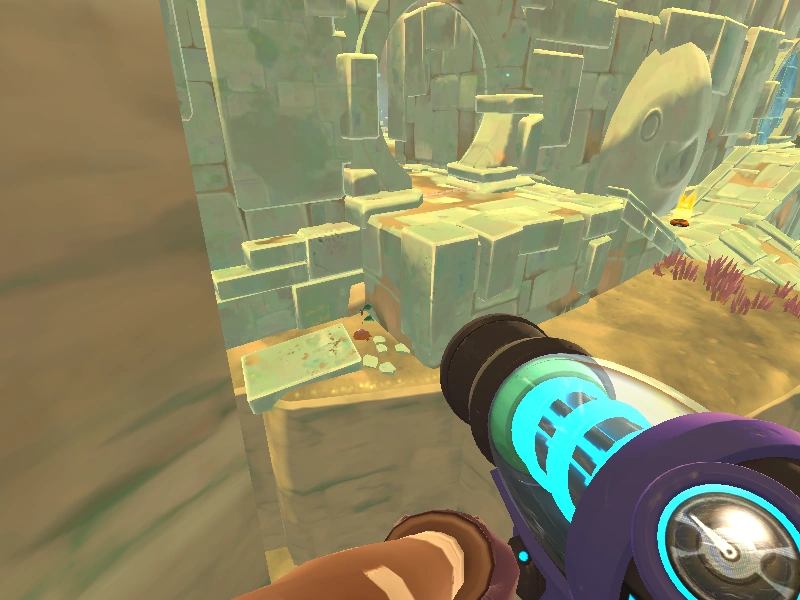
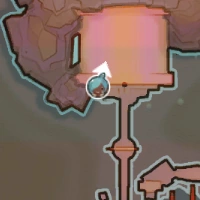
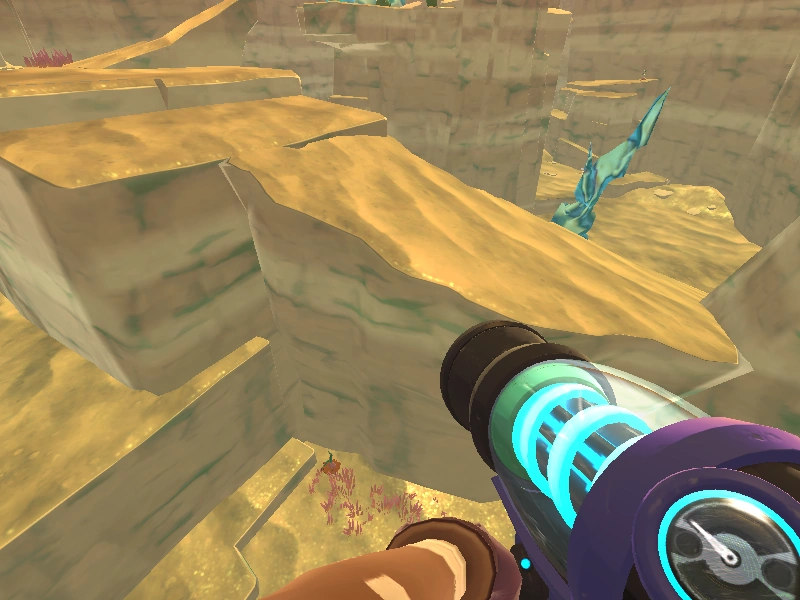
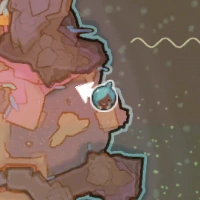
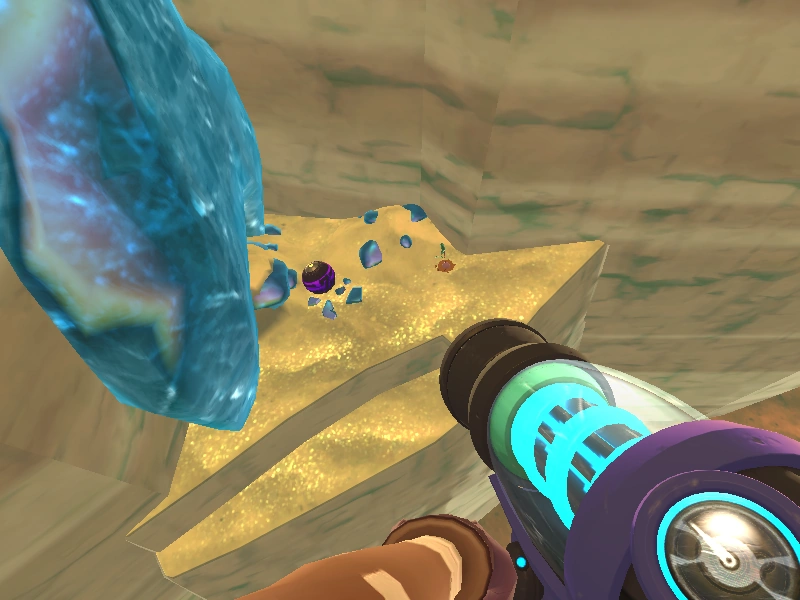
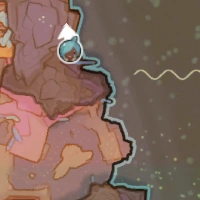
| + | |<center>'''#1 & 2'''</center> |
||
| − | |[[File:10-9-2017_12-47-54_AM.png|200px]] |
||
| − | |[[File: |
+ | |[[File:GG1&2.png|200px]] |
| + | |[[File:GG1&2map.png|150px]] |
||
| − | |On the East side of the entrance to The Glass Desert, next to a purple [[Treasure Pods|Treasure Pod]]. |
||
|- |
|- |
||
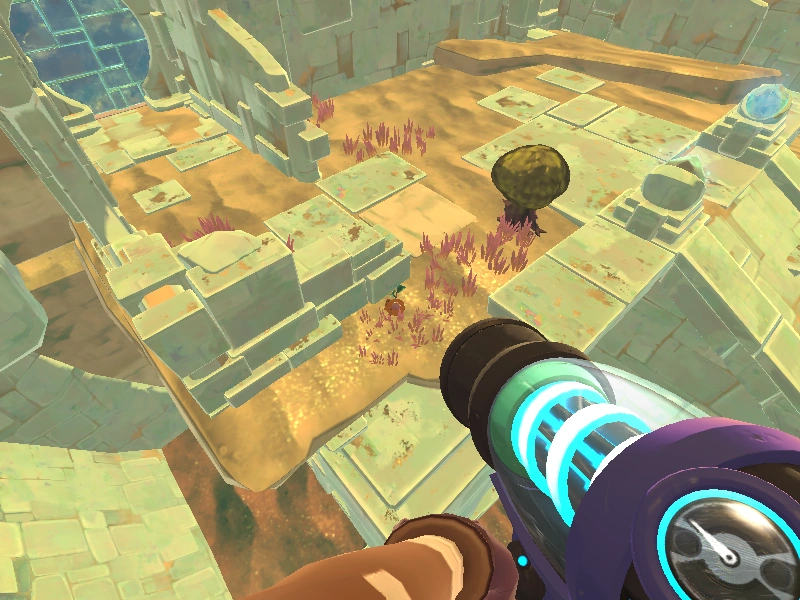
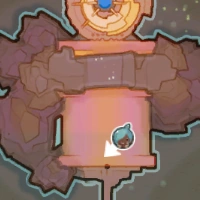
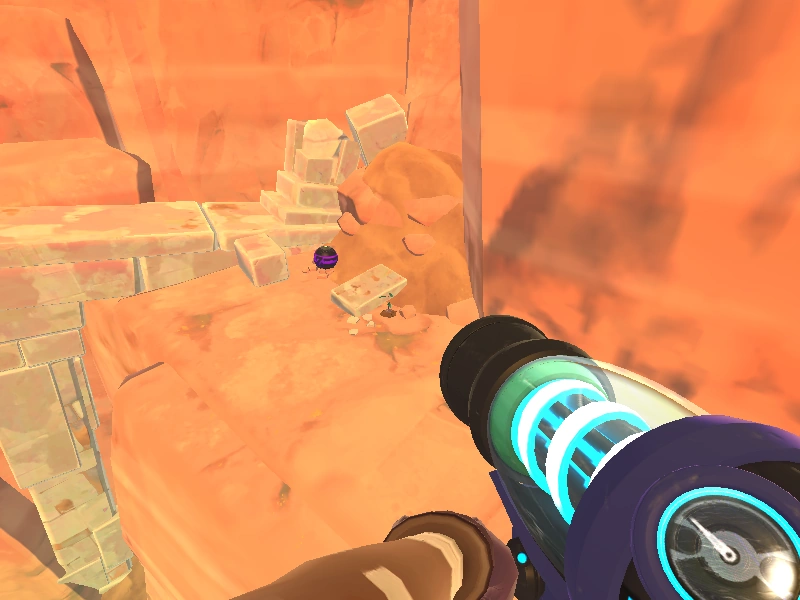
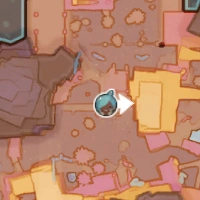
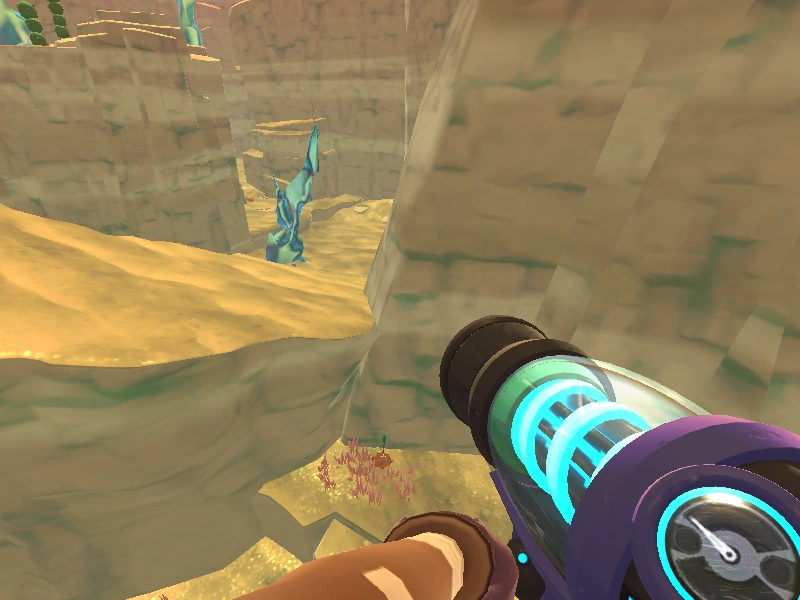
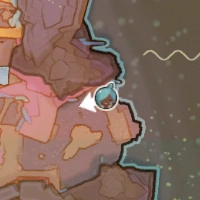
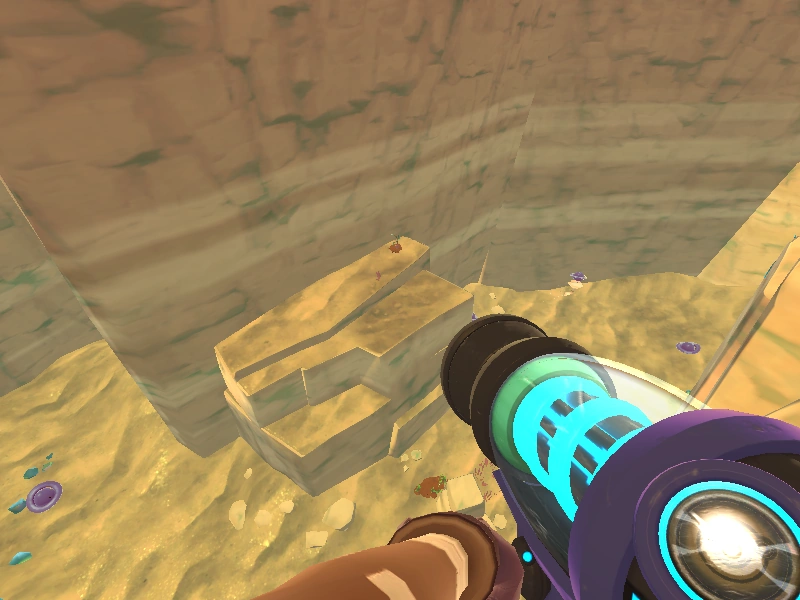
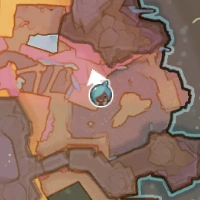
| + | |<center>'''#3'''</center> |
||
| − | |[[File:GildedGingerLocation_top-east-entrance-ramp.jpg|200px]] |
||
| − | |[[File: |
+ | |[[File:GG3.png|200px]] |
| + | |[[File:GG3map.png|150px]] |
||
| − | |Near the entrance to The Glass Desert, on the west side of the top ramp. |
||
|- |
|- |
||
| + | |<center>'''#4'''</center> |
||
| − | |[[File:Gilded Ginger at Entrance.png|200px]] |
||
| − | |[[File: |
+ | |[[File:GG4.png|200px]] |
| + | |[[File:GG4map.png|150px]] |
||
| − | |A little bit further down the ramp at the entrance to The Glass Desert on the west side. |
||
|- |
|- |
||
| + | |<center>'''#5'''</center> |
||
| − | |[[File:20170825192108_1.jpg|200px]] |
||
| − | |[[File: |
+ | |[[File:GG5.png|200px]] |
| + | |[[File:GG5map.png|150px]] |
||
| − | |Near the entrance to The Glass Desert, on the East side of the middle ramp. |
||
|- |
|- |
||
| + | |<center>'''#6'''</center> |
||
| − | |[[File:GildedGingerSpot.gif|200px]] |
||
| − | |[[File: |
+ | |[[File:GG6.png|200px]] |
| + | |[[File:GG6map.png|150px]] |
||
| − | |Behind the north end of a fallen pillar in the first area of The Glass Desert, west of the first [[oasis]]. |
||
|- |
|- |
||
| + | |<center>'''#7'''</center> |
||
| − | |[[File:Gilded_ginger_loc2.png|200px]] |
||
| − | |[[File: |
+ | |[[File:GG7.png|200px]] |
| + | |[[File:GG7map.png|150px]] |
||
| − | |Near the outer wall of the first zone. |
||
|- |
|- |
||
| + | |<center>'''#8'''</center> |
||
| − | |[[File:SlimeRancher-2017-12-08-09-45-52-59.png|200px]] |
||
| − | |[[File: |
+ | |[[File:GG8.png|200px]] |
| + | |[[File:GG8map.png|150px]] |
||
| − | |Just behind the above. |
||
|- |
|- |
||
| + | |<center>'''#9'''</center> |
||
| − | |[[File:SlimeRancher-2017-08-23-01-40-08-50.png|200px]] |
||
| − | |[[File: |
+ | |[[File:GG9.png|200px]] |
| + | |[[File:GG9map.png|150px]] |
||
| − | |North of the previous location, closer to the Hen Hen nest. |
||
|- |
|- |
||
| + | |<center>'''#10'''</center> |
||
| − | |[[File:SlimeRancher-2017-08-15-04-59-15-61.png|200px]] |
||
| − | |[[File: |
+ | |[[File:GG10.png|200px]] |
| + | |[[File:GG10map.png|150px]] |
||
| − | |Directly north of the first [[oasis]], behind some fallen cinderblocks. |
||
|- |
|- |
||
| + | |<center>'''#11'''</center> |
||
| − | |[[File:NNK56YT.jpg|200px]] |
||
| − | |[[File: |
+ | |[[File:GG11.png|200px]] |
| + | |[[File:GG11map.png|150px]] |
||
| − | |Under the foundations of the Tangle [[fountain]]. |
||
|- |
|- |
||
| + | |<center>'''#12'''</center> |
||
| − | |[[File:20170825160057_1.jpg|200px]] |
||
| − | |[[File: |
+ | |[[File:GG12.png|200px]] |
| + | |[[File:GG12map.png|150px]] |
||
| − | |Behind the Tangle fountain on a cliff edge with a glass sculpture beside it, directly high above the semi-buried giant ''regular'' Slime Statue closest to the first visible Oasis/Oasis Bud. |
||
|- |
|- |
||
| + | |<center>'''#13'''</center> |
||
| − | |[[File:SlimeRancher-2017-08-09-02-33-28-16.png|200px]] |
||
| − | |[[File: |
+ | |[[File:GG74.png|200px]] |
| + | |[[File:GG74map.png|150px]] |
||
| − | |In a hidden alcove found near a Tangle Slime Statue, next to the Blue Treasure Pod. |
||
|- |
|- |
||
| + | |<center>'''#14'''</center> |
||
| − | |[[File:Another gilded ginger kappa.png|200px]] |
||
| − | |[[File: |
+ | |[[File:GG13.png|200px]] |
| + | |[[File:GG13map.png|150px]] |
||
| − | |High up, behind the [[Gordo Slimes/Locations#Dervish Gordo|Dervish Gordo]]. Across from the first tangle [[fountain]]. |
||
|- |
|- |
||
| + | |<center>'''#15'''</center> |
||
| − | |[[File:SlimeRancher-2017-08-09-07-36-57-90.png|200px]] |
||
| − | |[[File: |
+ | |[[File:GG14.png|200px]] |
| + | |[[File:GG14map.png|150px]] |
||
| − | |On top of rock formation directly in front of the first tangle [[fountain]] entrance. |
||
|- |
|- |
||
| + | |<center>'''#16'''</center> |
||
| − | |[[File:SlimeRancher-2017-08-20-03-03-31-42.png|200px]] |
||
| − | |[[File: |
+ | |[[File:GG15.png|200px]] |
| + | |[[File:GG15map.png|150px]] |
||
| − | |On a small ledge around the corner from the first tangle fountain, above the Dervish Gordo. |
||
|- |
|- |
||
| + | |<center>'''#17'''</center> |
||
| − | |[[File:20171008215009_1.jpg|200px]] |
||
| − | |[[File: |
+ | |[[File:GG16.png|200px]] |
| + | |[[File:GG16map.png|150px]] |
||
| − | |A bit above the last Gilded Ginger, with a much longer path to climb. |
||
|- |
|- |
||
| + | |<center>'''#18'''</center> |
||
| − | |[[File:GildedGingerLocation over-bridge-arch.jpg|200px]] |
||
| − | |[[File: |
+ | |[[File:GG17.png|200px]] |
| + | |[[File:GG17map.png|150px]] |
||
| − | |On top of the west ledge overlooking the arch after the bridge from the entrance area. |
||
|- |
|- |
||
| + | |<center>'''#19'''</center> |
||
| − | |[[File:SlimeRancher-2017-08-25-02-20-50-61.png|200px]] |
||
| − | |[[File: |
+ | |[[File:GG18.png|200px]] |
| + | |[[File:GG18map.png|150px]] |
||
| − | |Directly south of the Tangle fountain, at ground level. |
||
|- |
|- |
||
| + | |<center>'''#20'''</center> |
||
| − | |[[File:SlimeRancher-2017-08-16-02-27-21-68.gif|200px]] |
||
| − | |[[File: |
+ | |[[File:GG19.png|200px]] |
| + | |[[File:GG19map.png|150px]] |
||
| − | |Just before the third [[oasis]], next to the ramp. |
||
|- |
|- |
||
| + | |<center>'''#21'''</center> |
||
| − | |[[File:20170812173248_1.jpg|200px]] |
||
| − | |[[File: |
+ | |[[File:GG20.png|200px]] |
| + | |[[File:GG20map.png|150px]] |
||
| − | |Just after the third [[oasis]], drop down and turn around. |
||
|- |
|- |
||
| + | |<center>'''#22'''</center> |
||
| − | |[[File:Gilded Ginger 3.png|200px]] |
||
| − | |[[File: |
+ | |[[File:GG21.png|200px]] |
| + | |[[File:GG21map.png|150px]] |
||
| − | |In a small cave housing two Hen nests, underneath the steps leading up to an [[Oasis]]. |
||
| + | |} |
||
| + | |||
| + | |||
| + | ==Tangle Gordo Tower Courtyard== |
||
| + | {| class="article-table" align="center" |
||
| + | |+ |
||
|- |
|- |
||
| + | !<center>Number</center> |
||
| − | |[[File:20170820220632 1.jpg|200px]] |
||
| + | !<center>In-game screenshot</center> |
||
| − | |[[File:20170820220639 1.jpg|200px]] |
||
| + | !<center>Map</center> |
||
| − | |In the same area as the Tangle Gordo. |
||
|- |
|- |
||
| + | |<center>'''#23'''</center> |
||
| − | |[[File:GildedGingerWestOfSteps.png|200px]] |
||
| − | |[[File: |
+ | |[[File:GG22.png|200px]] |
| + | |[[File:GG22map.png|150px]] |
||
| − | |West of the steps leading to the Tangle Gordo. |
||
|- |
|- |
||
| + | |<center>'''#24'''</center> |
||
| − | |[[File:SlimeRancher-2017-08-11-11-30-15-00.png|200px]] |
||
| − | |[[File: |
+ | |[[File:GG23.png|200px]] |
| + | |[[File:GG23map.png|150px]] |
||
| − | |Directly west of the [[Gordo Slimes/Locations#Tangle Gordo|Tangle Gordo]] or return teleporter building, behind the broken base of a pillar, just before the first [[Slime Gate]] |
||
|- |
|- |
||
| + | |<center>'''#25'''</center> |
||
| − | |[[File:TangleStructureNest.png|200px]] |
||
| − | |[[File: |
+ | |[[File:GG24.png|200px]] |
| + | |[[File:GG24map.png|150px]] |
||
| − | |Just east of the eastern [[oasis]] in the large area with the [[Gordo Slimes/Locations#Tangle Gordo|Tangle Gordo]] or return teleporter. |
||
|- |
|- |
||
| + | |<center>'''#26'''</center> |
||
| − | |[[File:Gilded_4.png|200px]] |
||
| − | |[[File: |
+ | |[[File:GG25.png|200px]] |
| + | |[[File:GG25map.png|150px]] |
||
| − | |In the small ruins north of the Slime Gate by the [[Fountain|Rock Fountain]], next to a palm tree. |
||
|- |
|- |
||
| + | |<center>'''#27'''</center> |
||
| − | |[[File:10-9-2017_12-47-31_AM.png|200px]] |
||
| − | |[[File: |
+ | |[[File:GG26.png|200px]] |
| + | |[[File:GG26map.png|150px]] |
||
| − | |In the small ruins southeast of the [[Gordo Slimes/Locations#Tangle Gordo|Tangle Gordo]] or return teleporter, above the second [[Slime Gate]], in a [[Heart Beet|heart beet]] patch. |
||
|- |
|- |
||
| + | |<center>'''#28'''</center> |
||
| − | |[[File:Rock fountain kappa.png|200px]] |
||
| − | |[[File: |
+ | |[[File:GG27.png|200px]] |
| + | |[[File:GG27map.png|150px]] |
||
| − | |In the bottom of the small ruins southeast of the [[Gordo Slimes/Locations#Tangle Gordo|Tangle Gordo]] or return teleporter, behind the rock [[fountain]]. |
||
|- |
|- |
||
| + | |<center>'''#29'''</center> |
||
| − | |[[File:GildedGingerUnderBrokenBridge.png|200px]] |
||
| − | |[[File: |
+ | |[[File:GG28.png|200px]] |
| + | |[[File:GG28map.png|150px]] |
||
| − | |Located under the broken bridge leading to the Mosaic Fountain ruins. |
||
|- |
|- |
||
| + | |<center>'''#30'''</center> |
||
| − | |[[File:Ginger_4_sc.png|200px]] |
||
| − | |[[File: |
+ | |[[File:GG29.png|200px]] |
| + | |[[File:GG29map.png|150px]] |
||
| − | |Behind the Mosaic fountain ruins, on the island just past the northern [[Slime Gate]]. |
||
| + | |} |
||
| + | |||
| + | ==Miscellaneous== |
||
| + | |||
| + | {| class="article-table" align="center" |
||
| + | |+ |
||
|- |
|- |
||
| + | !<center>Number</center> |
||
| − | |[[File:SlimeRancher-2017-08-17-01-28-42-87.png|200px]] |
||
| + | !<center>In-game screenshot</center> |
||
| − | |[[File:GildedGingerWestIslandLocation.png|200px]] |
||
| + | !<center>Map</center> |
||
| − | |On top of the largest island west of the Mosaic fountain ruins. |
||
|- |
|- |
||
| + | |<center>'''#31'''</center> |
||
| − | |[[File:Gilded Ginger1.png|200px]] |
||
| − | |[[File: |
+ | |[[File:GG30.png|200px]] |
| + | |[[File:GG30map.png|150px]] |
||
| − | |On a small ledge just below the west wall of the West [[Feral Slimes|Feral]] [[Rock Slime]] canyon, just past the northern [[Slime Gate]]. |
||
| + | |} |
||
| + | |||
| + | ==West Slime Gate== |
||
| + | |||
| + | {| class="article-table" align="center" |
||
| + | |+ |
||
|- |
|- |
||
| + | !<center>Number</center> |
||
| − | |[[File:GlassDesertRockFeralOasisPlatform.png|200px]] |
||
| + | !<center>In-game screenshot</center> |
||
| − | |[[File:GlassDesertRockFeralOasisPlatformMap.png|200px]] |
||
| + | !<center>Map</center> |
||
| − | |Past the northern [[Slime Gate]], just after the West [[Feral Slimes|Feral]] [[Rock Slime]] canyon, drop down and turn around. |
||
|- |
|- |
||
| + | |<center>'''#32'''</center> |
||
| − | |[[File:RockFeralOasisCorner.png|200px]] |
||
| − | |[[File: |
+ | |[[File:GG31.png|200px]] |
| + | |[[File:GG31map.png|150px]] |
||
| − | |In the drop off, after the West [[Feral Slimes|Feral]] [[Rock Slime]] canyon, after the northern [[Slime Gate]]. It is in the far corner behind the Glass Sculpture, hidden in the grass. |
||
|- |
|- |
||
| + | |<center>'''#33'''</center> |
||
| − | |[[File:SlimeRancher-2017-08-08-03-09-02-24.png|200px]] |
||
| − | |[[File: |
+ | |[[File:GG32.png|200px]] |
| + | |[[File:GG32map.png|150px]] |
||
| − | |In an alcove north of the first [[oasis]] after the West [[Feral Slimes|Feral]] [[Rock Slime]] canyon, past the northern [[Slime Gate]]. |
||
|- |
|- |
||
| + | |<center>'''#34'''</center> |
||
| − | |[[File:Mosaicpathstart.gif|200px]] |
||
| − | |[[File: |
+ | |[[File:GG33.png|200px]] |
| + | |[[File:GG33map.png|150px]] |
||
| − | |In a hidden area above the rest of the map, behind where the Mosaic Gordo is located, to the right. |
||
|- |
|- |
||
| + | |<center>'''#35'''</center> |
||
| − | |[[File:Mosaic path end.png|200px]] |
||
| − | |[[File: |
+ | |[[File:GG34.png|200px]] |
| + | |[[File:GG34map.png|150px]] |
||
| − | |In the hidden area above the rest of the map; just to the right, behind the [[Gordo Slimes/Locations#Mosaic Gordo|Mosaic Gordo]], follow a small ledge then drop down and turn around. |
||
|- |
|- |
||
| + | |<center>'''#36, #37,<br />and #38'''</center> |
||
| − | |[[File:Gilded Ginger picture taken by user Rm12642.jpg|200px]] |
||
| − | |[[File: |
+ | |[[File:GG35&36&37.png|200px]] |
| + | |[[File:GG35&36&37map.png|150px]] |
||
| − | |In the hidden area above the rest of the map, just past the [[Gordo Slimes/Locations#Mosaic Gordo|Mosaic Gordo]], drop down to a hidden alcove. |
||
|- |
|- |
||
| + | |<center>'''#39'''</center> |
||
| − | |[[File:20170811111514 1.jpg|200px]] |
||
| − | |[[File: |
+ | |[[File:GG38.png|200px]] |
| + | |[[File:GG38map.png|150px]] |
||
| − | |In the hidden area above the rest of the map, just past the [[Gordo Slimes/Locations#Mosaic Gordo|Mosaic Gordo]], drop down to a hidden alcove. |
||
|- |
|- |
||
| + | |<center>'''#40'''</center> |
||
| − | |[[File:Gilded Ginger 2.png|200px]] |
||
| − | |[[File: |
+ | |[[File:GG39.png|200px]] |
| + | |[[File:GG39map.png|150px]] |
||
| − | |Above the area just beyond the eastern [[Feral Slimes|Feral]] [[Rock Slime]] canyon. Along the western wall on a ledge overlooking the enterance to the area with the eastern [[Slime Gate]]. |
||
|- |
|- |
||
| + | |<center>'''#41'''</center> |
||
| − | |[[File:GildedGingerFireSlimeCanyon.jpg|200px]] |
||
| − | |[[File: |
+ | |[[File:GG40.png|200px]] |
| + | |[[File:GG40map.png|150px]] |
||
| − | |In the area just beyond the eastern [[Feral Slimes|Feral]] [[Rock Slime]] canyon. In the northeast corner of the area, follow a ramp up to the first turn, then drop off and turn around. |
||
|- |
|- |
||
| + | |<center>'''#42'''</center> |
||
| − | |[[File:SlimeRancher-2017-08-22-04-35-23-57.png|200px]] |
||
| − | |[[File: |
+ | |[[File:GG41.png|200px]] |
| + | |[[File:GG41map.png|150px]] |
||
| − | |Right next to the above. |
||
| + | |} |
||
| + | |||
| + | ==Northern Glass Desert== |
||
| + | |||
| + | {| class="article-table" align="center" |
||
| + | |+ |
||
|- |
|- |
||
| + | !<center>Number</center> |
||
| − | |[[File:GildedGingerLocation eastern-canyon-middle-ledge.jpg|200px]] |
||
| + | !<center>In-game screenshot</center> |
||
| − | |[[File:GildedGingerLocation eastern-canyon-middle-ledge map.jpg|200px]] |
||
| + | !<center>Map</center> |
||
| − | |Near the above two locations. |
||
|- |
|- |
||
| + | |<center>'''#43'''</center> |
||
| − | |[[File:SlimeRancher-2017-08-11-07-58-40-57.png|200px]] |
||
| − | |[[File: |
+ | |[[File:GG42.png|200px]] |
| + | |[[File:GG42map.png|150px]] |
||
| − | |In the area just beyond the eastern [[Feral Slimes|Feral]] [[Rock Slime]] canyon. Along the north wall of the area, about half way up, on a ledge. |
||
|- |
|- |
||
| + | |<center>'''#44'''</center> |
||
| − | |[[File:10-9-2017_1-07-47_AM.png|200px]] |
||
| + | |[[File:GG43.png|200px]] |
||
| − | |[[File:Gilded_carrot_map_screenshot.jpg|thumb|left|201x201px]] |
||
| + | |[[File:GG43map.png|150px]] |
||
| − | |Below the above location, in the eastern [[Feral Slimes|Feral]] [[Rock Slime]] canyon, right before you go up the ramp. |
||
|- |
|- |
||
| + | |<center>'''#45 and #46'''</center> |
||
| − | |[[File:20170818152022 1.jpg|200px]] |
||
| − | |[[File: |
+ | |[[File:GG44&45.png|200px]] |
| + | |[[File:GG44&45map.png|150px]] |
||
| − | |In the area just beyond the eastern [[Feral Slimes|Feral]] [[Rock Slime]] canyon. Fly over the sand ocean east of the area to a hidden ledge with a purple [[Treasure Pods|Treasure Pod]]. |
||
|- |
|- |
||
| + | |<center>'''#47'''</center> |
||
| − | |[[File:SpiritedSardonicIncatern-size_restricted.gif|200px]] |
||
| − | |[[File: |
+ | |[[File:GG46.png|200px]] |
| + | |[[File:GG46map.png|150px]] |
||
| − | |Behind the Ruins area. |
||
|- |
|- |
||
| + | |<center>'''#48'''</center> |
||
| − | |[[File:20170810182704_1.jpg|200px]] |
||
| − | |[[File: |
+ | |[[File:GG47.png|200px]] |
| + | |[[File:GG47map.png|150px]] |
||
| − | |Near the large ruins structure in the furthest part of The Glass Desert. |
||
|- |
|- |
||
| + | |<center>'''#49'''</center> |
||
| − | |[[File:SlimeRancher 2017-08-11 18-12-09.jpg|200px]] |
||
| − | |[[File: |
+ | |[[File:GG48.png|200px]] |
| + | |[[File:GG48map.png|150px]] |
||
| − | |Behind the Dervish [[fountain]]. |
||
|- |
|- |
||
| + | |<center>'''#50'''</center> |
||
| − | |[[File:20170818185205_1.jpg|200px]] |
||
| − | |[[File: |
+ | |[[File:GG49.png|200px]] |
| + | |[[File:GG49map.png|150px]] |
||
| − | |In the closed off area next to two [[Silver Parsnip]] patches and inhabited by [[Mosaic Slime]]s. |
||
|- |
|- |
||
| + | |<center>'''#51'''</center> |
||
| − | |[[File:Ifoundagingerlocatonlol.png|200px]] |
||
| − | |[[File: |
+ | |[[File:GG50.png|200px]] |
| + | |[[File:GG50map.png|150px]] |
||
| − | |Next to the hole leading to the cave with the Cocoa Slime Lamp Treasure Pod. |
||
|- |
|- |
||
| + | |<center>'''#52'''</center> |
||
| − | |[[File:GildedGingerLocation -44.jpg|200px]] |
||
| − | |[[File: |
+ | |[[File:GG51.png|200px]] |
| + | |[[File:GG51map.png|150px]] |
||
| − | |In the corridor connected to the ruins containing the Dervish fountain, almost directly under the Hobson note. |
||
|- |
|- |
||
| + | |<center>'''#53'''</center> |
||
| − | |[[File:SlimeRancher-2017-08-10-11-36-50-75.png|200px]] |
||
| − | |[[File: |
+ | |[[File:GG52.png|200px]] |
| + | |[[File:GG52map.png|150px]] |
||
| − | | |
||
|- |
|- |
||
| + | |<center>'''#54'''</center> |
||
| − | |[[File:SlimeRancher-2017-08-11-11-02-11-10.png|200px]] |
||
| − | |[[File: |
+ | |[[File:GG53.png|200px]] |
| + | |[[File:GG53map.png|150px]] |
||
| − | | |
||
|- |
|- |
||
| + | |<center>'''#55 and #56'''</center> |
||
| − | |[[File:20170815144800_1.jpg|200px]] |
||
| − | |[[File: |
+ | |[[File:GG54&55.png|200px]] |
| + | |[[File:GG54&55map.png|150px]] |
||
| − | |In the cave housing the Cocoa Slime Lamp Treasure Pod, interconnecting the northern area of the Glass Desert with an [[Oasis]]. Mosic Slimes naturally spawn here. |
||
|- |
|- |
||
| + | |<center>'''#57'''</center> |
||
| − | |[[File:GDRuins.png|200px]] |
||
| − | |[[File: |
+ | |[[File:GG56.png|200px]] |
| + | |[[File:GG56map.png|150px]] |
||
| − | |On the large ruins structure at the north of The Glass Desert. |
||
|- |
|- |
||
| + | |<center>'''#58'''</center> |
||
| − | |[[File:Ginger1.png|200px]] |
||
| − | |[[File: |
+ | |[[File:GG57.png|200px]] |
| + | |[[File:GG57map.png|150px]] |
||
| − | |On the lower side of the large rock, near the Warp Terminal building. |
||
| + | |} |
||
| + | |||
| + | ==Behind the Mosaic Gordo== |
||
| + | |||
| + | {| class="article-table" align="center" |
||
| + | |+ |
||
|- |
|- |
||
| + | !<center>Number</center> |
||
| − | |[[File:Gilded_3.png|200px]] |
||
| + | !<center>In-game screenshot</center> |
||
| − | |[[File:Gilded_3_map.png|200px]] |
||
| + | !<center>Map</center> |
||
| − | |In the Warp Terminal building, next to the Prickle Pear tree. |
||
| − | |- |
||
| − | |[[File:Last building.png|200px]] |
||
| − | |[[File:Last building map.png|200px]] |
||
| − | |In the last building, left of the left door. |
||
|- |
|- |
||
| + | |<center>'''#59'''</center> |
||
| − | |[[File:20180112123854 1.jpg|centre|thumb|198x198px]] |
||
| − | |[[File: |
+ | |[[File:GG58.png|200px]] |
| + | |[[File:GG58map.png|150px]] |
||
| − | |In front of the door to the left as you face the building. |
||
|- |
|- |
||
| + | |<center>'''#60'''</center> |
||
| − | |[[File:GDWarpTerminal.png|200px]] |
||
| − | |[[File: |
+ | |[[File:GG59.png|200px]] |
| + | |[[File:GG59map.png|150px]] |
||
| − | |In the Warp Terminal building at the northernmost area of The Glass Desert. |
||
|- |
|- |
||
| + | |<center>'''#61 and #62'''</center> |
||
| − | |[[File:SlimeRancher-2017-08-14-10-55-45-12.gif|200px]] |
||
| − | |[[File: |
+ | |[[File:GG60&61.png|200px]] |
| + | |[[File:GG60&61map.png|150px]] |
||
| − | |On the northeast outside edge of the final room. |
||
|- |
|- |
||
| + | |<center>'''#63'''</center> |
||
| − | |[[File:GildedGingerLocation northwest-outside-final-room.jpg|200px]] |
||
| − | |[[File: |
+ | |[[File:GG62.png|200px]] |
| + | |[[File:GG62map.png|150px]] |
||
| − | | |
||
| − | On the northwest outside edge of the final room. |
||
|} |
|} |
||
| − | ===Unconfirmed=== |
||
| + | ==East Slime Gate== |
||
| − | The following locations were reported without screenshots or screenshots were provided without a Ginger in the ground and '''could be incorrect'''. If you find one at one of these locations, please provide the wiki with a screenshot of the Ginger in the ground. |
||
| + | {| class="article-table" align="center" |
||
| − | |||
| − | {| class="article-table" |
||
|+ |
|+ |
||
|- |
|- |
||
| + | !<center>Number</center> |
||
!<center>In-game screenshot</center> |
!<center>In-game screenshot</center> |
||
!<center>Map</center> |
!<center>Map</center> |
||
| − | !<center>Additional notes</center> |
||
| − | | |
||
|- |
|- |
||
| + | |<center>'''#64'''</center> |
||
| − | | |
||
| + | |[[File:GG63.png|200px]] |
||
| − | | |
||
| + | |[[File:GG63map.png|150px]] |
||
| − | | |
||
| − | | |
+ | |- |
| + | |<center>'''#65'''</center> |
||
| + | |[[File:GG64.png|200px]] |
||
| + | |[[File:GG64map.png|150px]] |
||
| + | |- |
||
| + | |<center>'''#66'''</center> |
||
| + | |[[File:GG65.png|200px]] |
||
| + | |[[File:GG65map.png|150px]] |
||
| + | |- |
||
| + | |<center>'''#67'''</center> |
||
| + | |[[File:GG66.png|200px]] |
||
| + | |[[File:GG66map.png|150px]] |
||
| + | |- |
||
| + | |<center>'''#68'''</center> |
||
| + | |[[File:GG67.png|200px]] |
||
| + | |[[File:GG67map.png|150px]] |
||
| + | |- |
||
| + | |<center>'''#69'''</center> |
||
| + | |[[File:GG68.png|200px]] |
||
| + | |[[File:GG68map.png|150px]] |
||
| + | |- |
||
| + | |<center>'''#70'''</center> |
||
| + | |[[File:GG69.png|200px]] |
||
| + | |[[File:GG69map.png|150px]] |
||
| + | |- |
||
| + | |<center>'''#71'''</center> |
||
| + | |[[File:GG70.png|200px]] |
||
| + | |[[File:GG70map.png|150px]] |
||
| + | |- |
||
| + | |<center>'''#72'''</center> |
||
| + | |[[File:GG71.png|200px]] |
||
| + | |[[File:GG71map.png|150px]] |
||
| + | |- |
||
| + | |<center>'''#73'''</center> |
||
| + | |[[File:GG72.png|200px]] |
||
| + | |[[File:GG72map.png|150px]] |
||
| + | |- |
||
| + | |<center>'''#74'''</center> |
||
| + | |[[File:GG73.png|200px]] |
||
| + | |[[File:GG73map.png|150px]] |
||
|} |
|} |
||
| + | |||
| − | {{navbox}}[[File:Gilded_carrot_map_screenshot.jpg|thumb|left]] |
||
| + | |||
| + | |||
| + | {{NavboxNavigationUpdate}} |
||
| + | {{Navbox}} |
||
[[Category:Pages with map locations]] |
[[Category:Pages with map locations]] |
||
[[Category:Exclusive to The Glass Desert]] |
[[Category:Exclusive to The Glass Desert]] |
||
| − | [[Category:Locations]] |
||
Latest revision as of 23:11, 4 December 2018

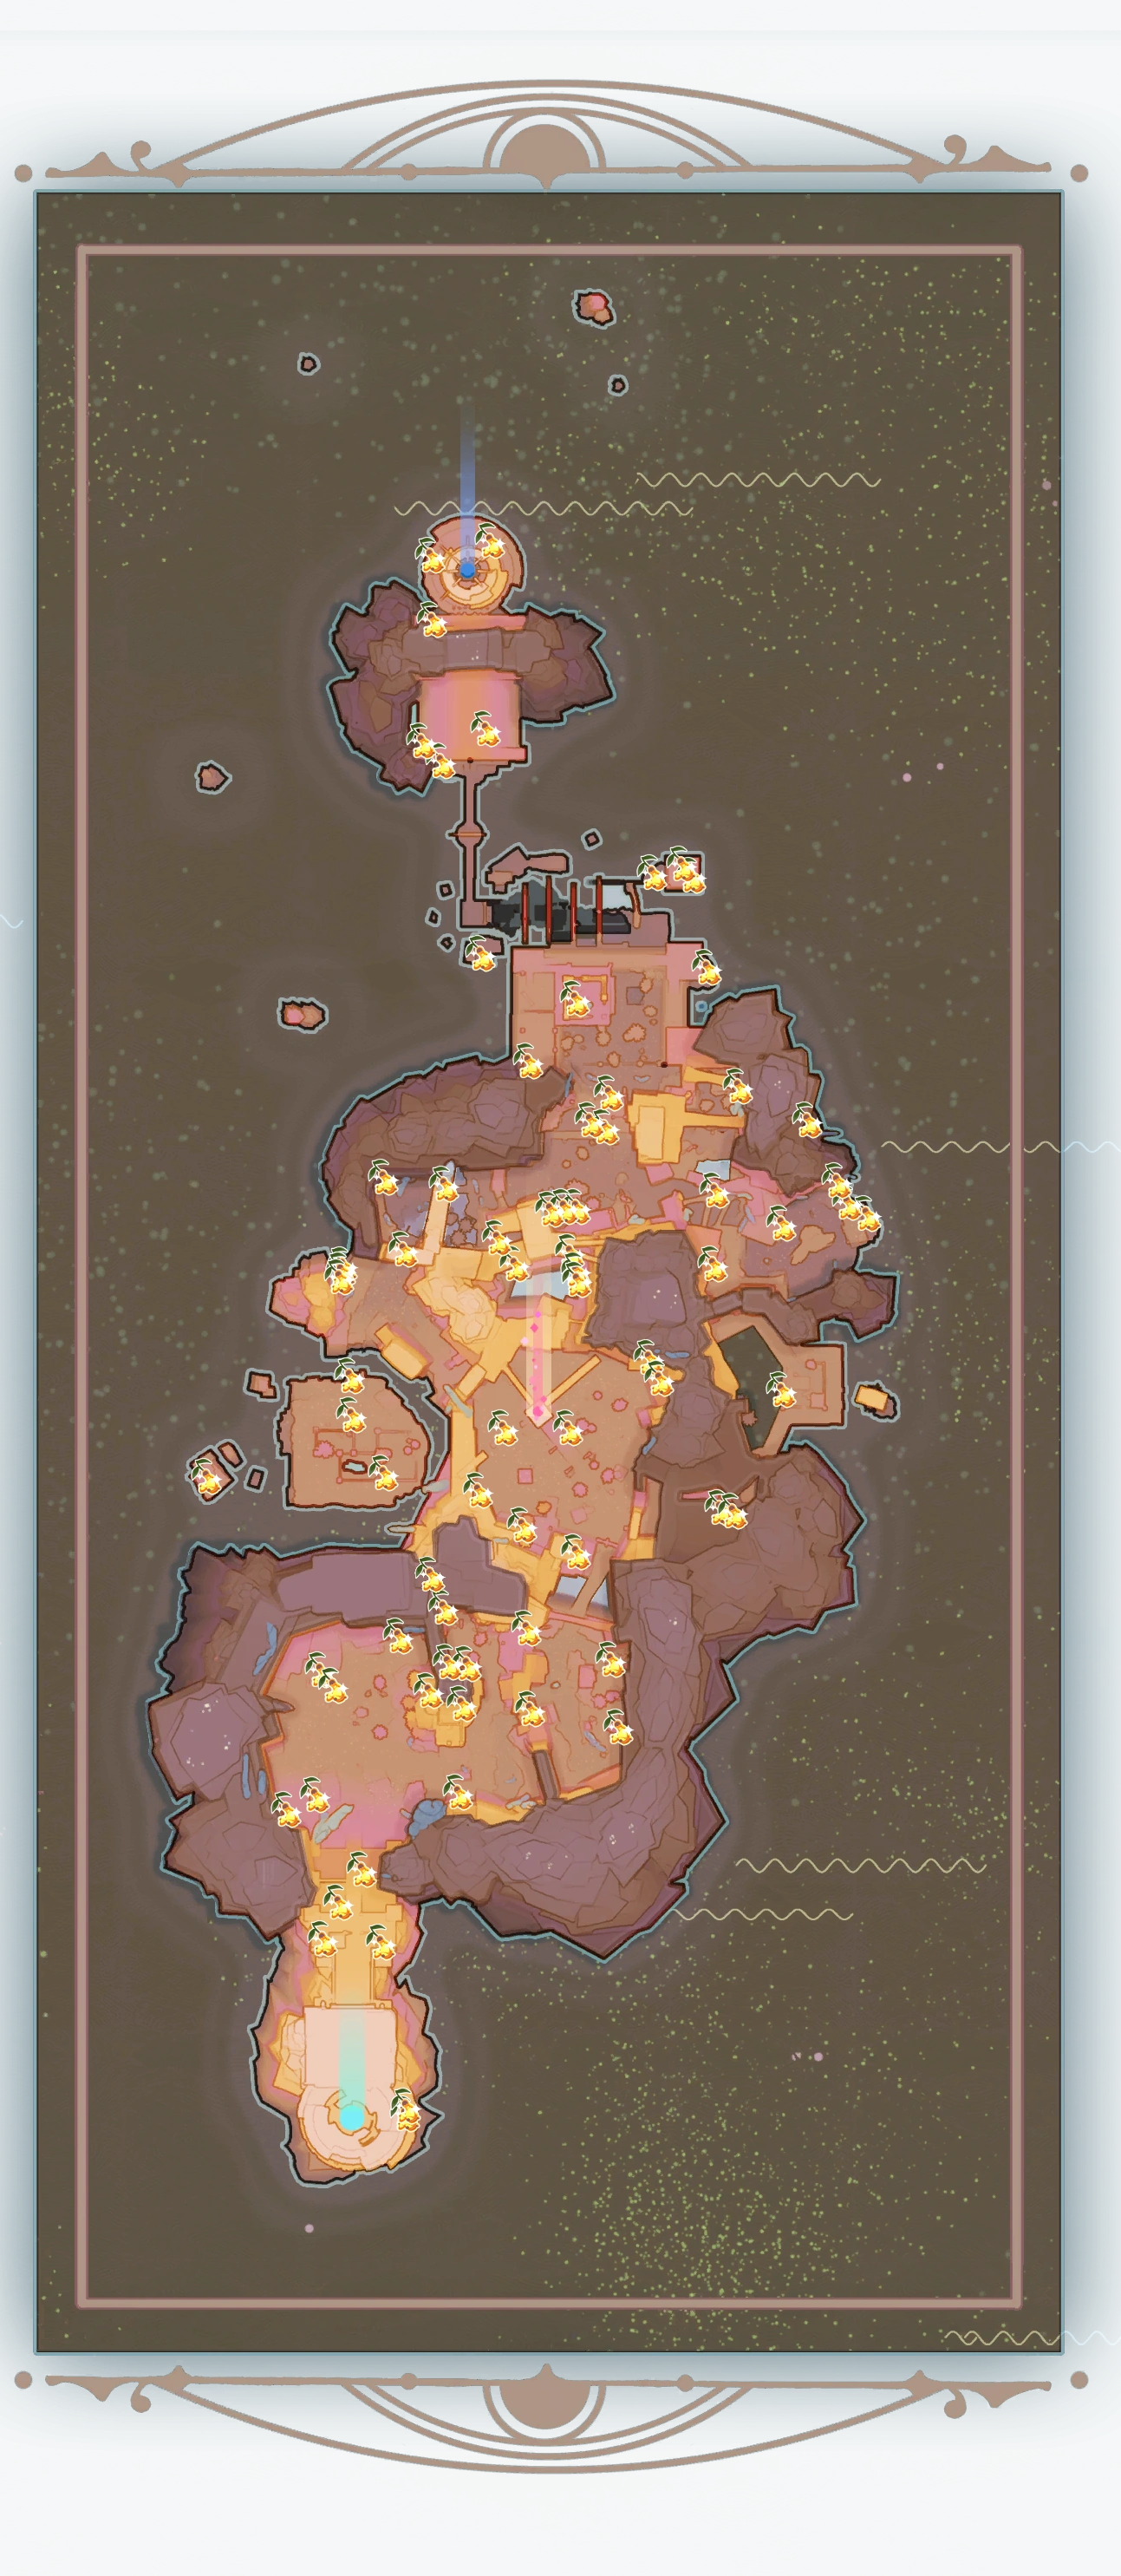
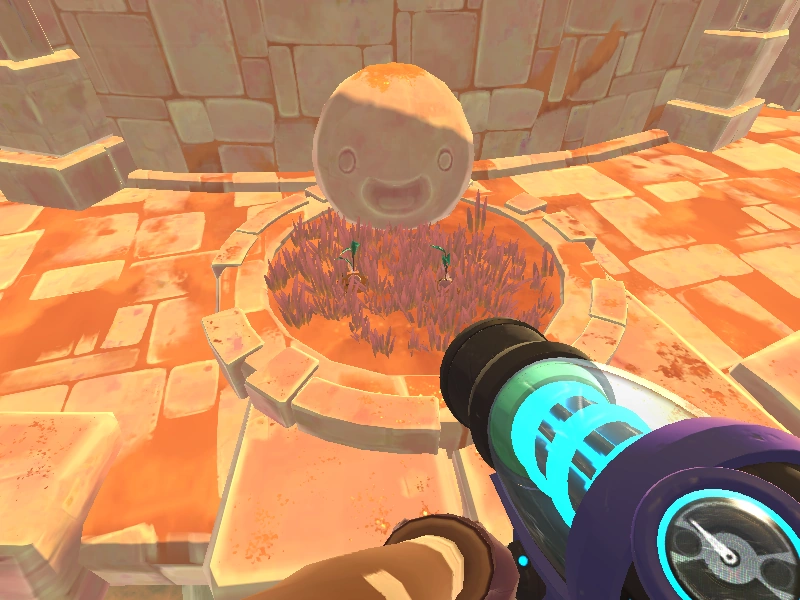
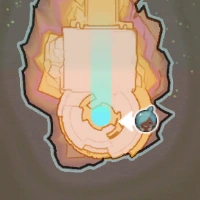
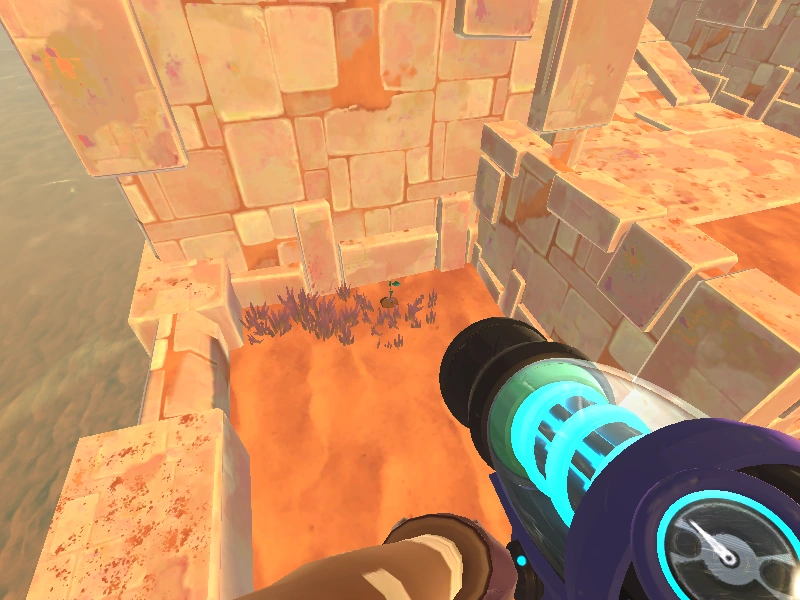
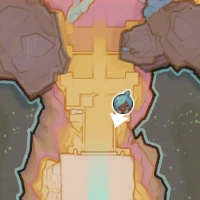
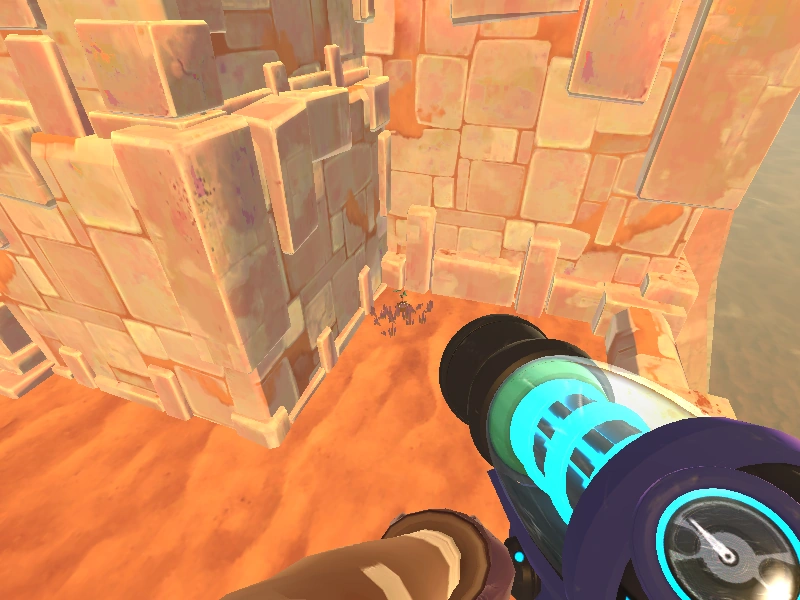
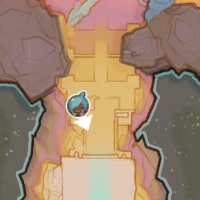
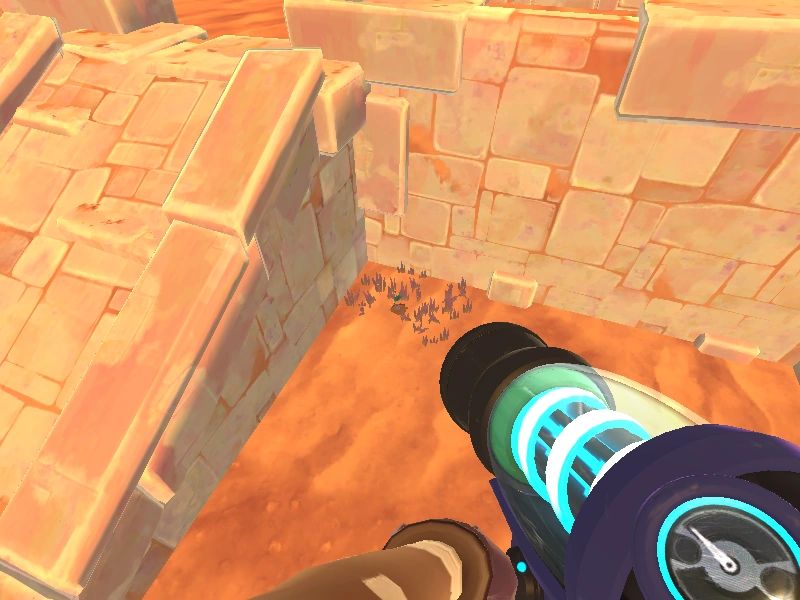
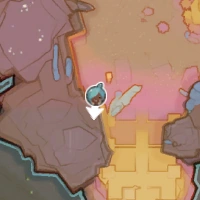
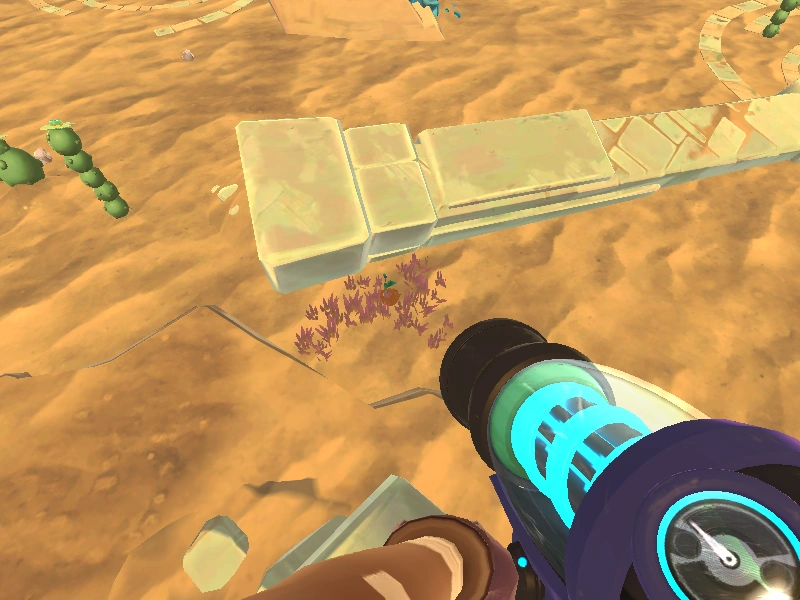
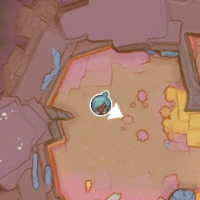
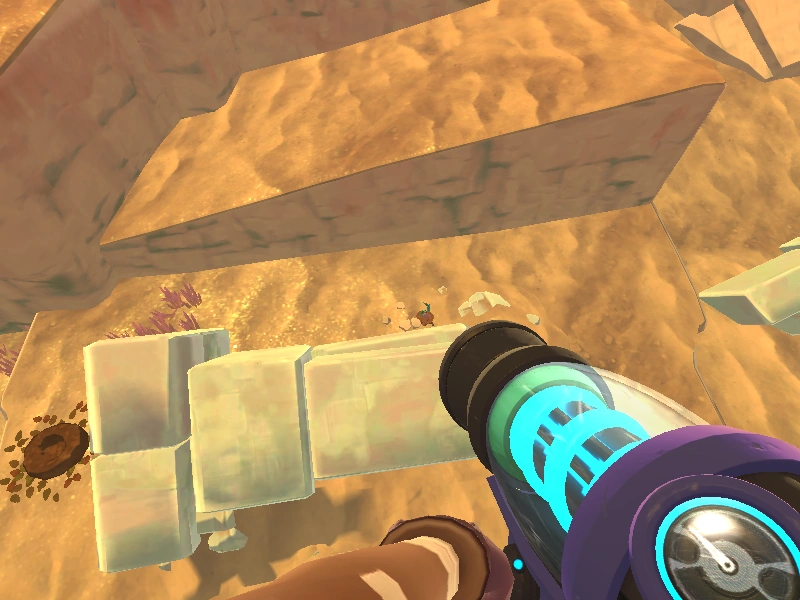
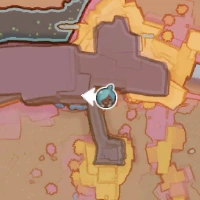
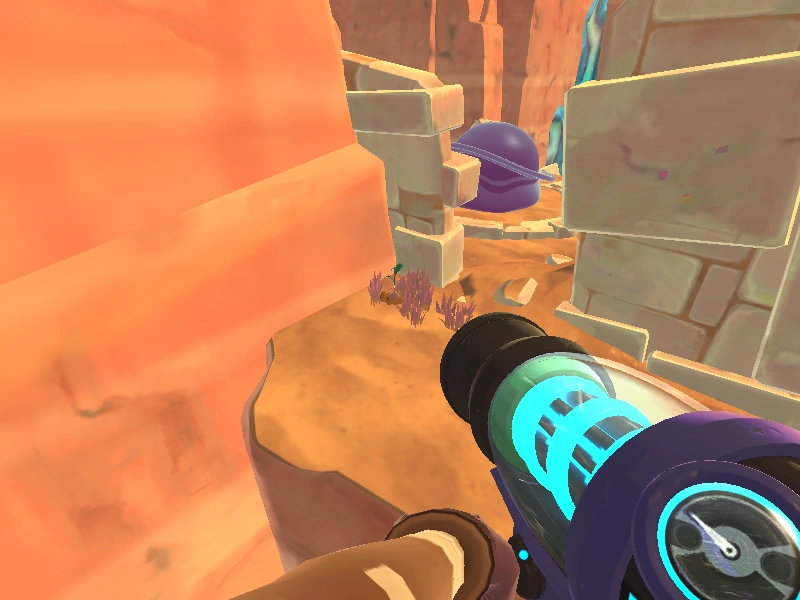
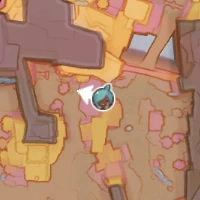
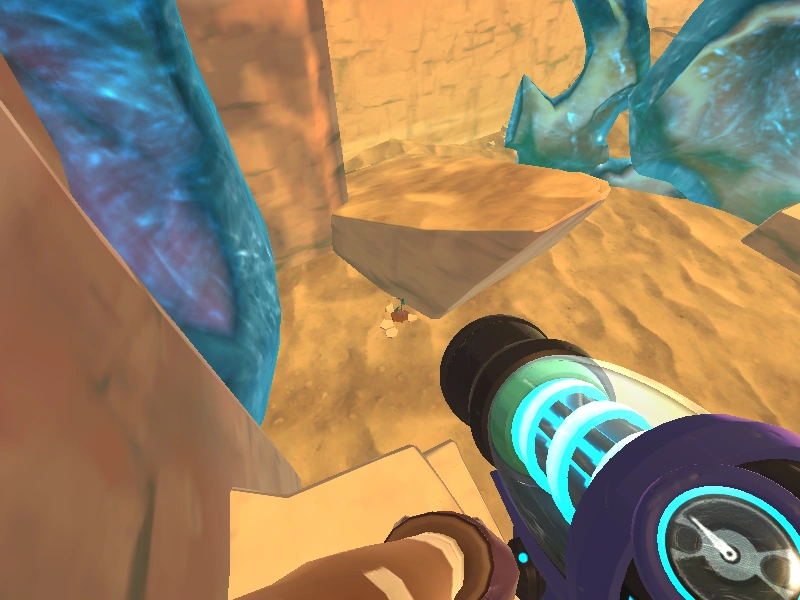
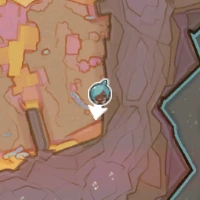
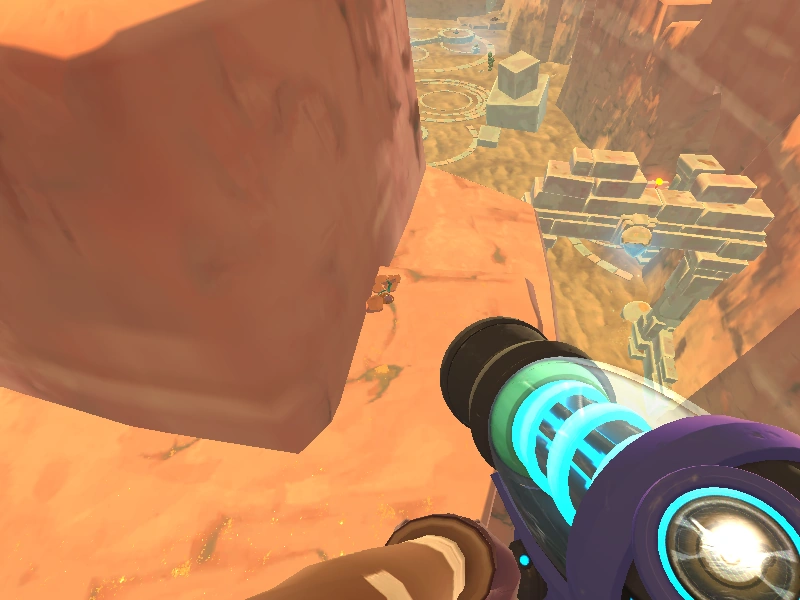
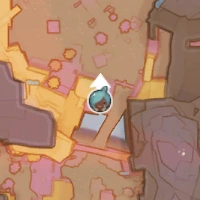
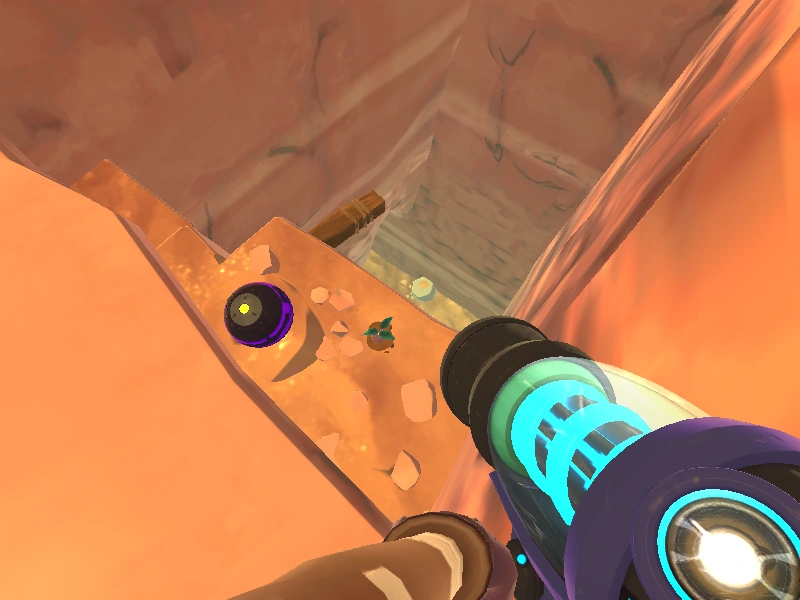
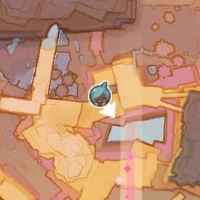
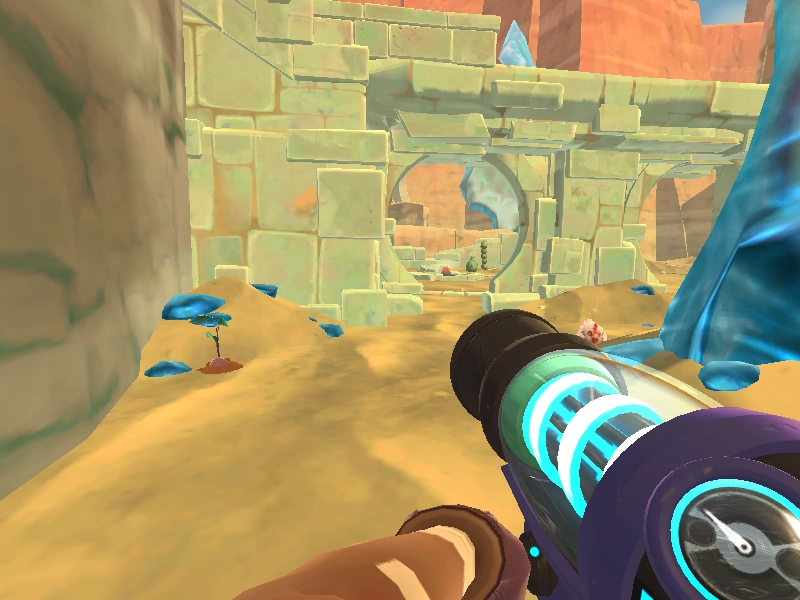
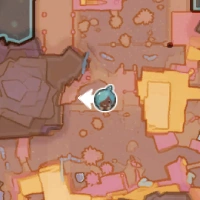
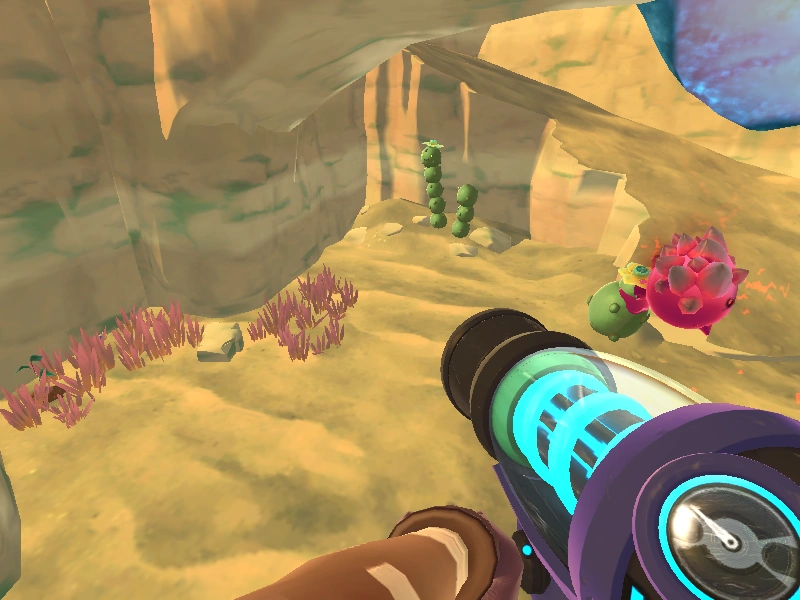
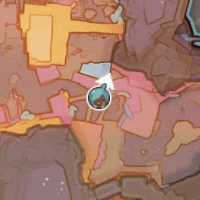
Two Gilded Gingers can spawn in any of the 74 possible locations on a given day.
Since the in-game map is very simplistic prior to being unlocked using Map Data Nodes and this page uses fully-unlocked maps to pinpoint locations, it is recommended to activate the Desert's Map node first before proceeding.
Some images may have multiple Gilded Gingers to showcase that a single location has multiple spawn points.
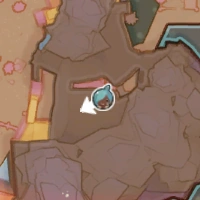
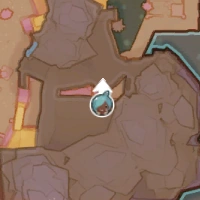
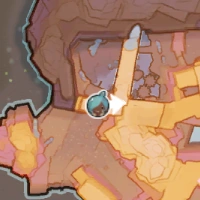
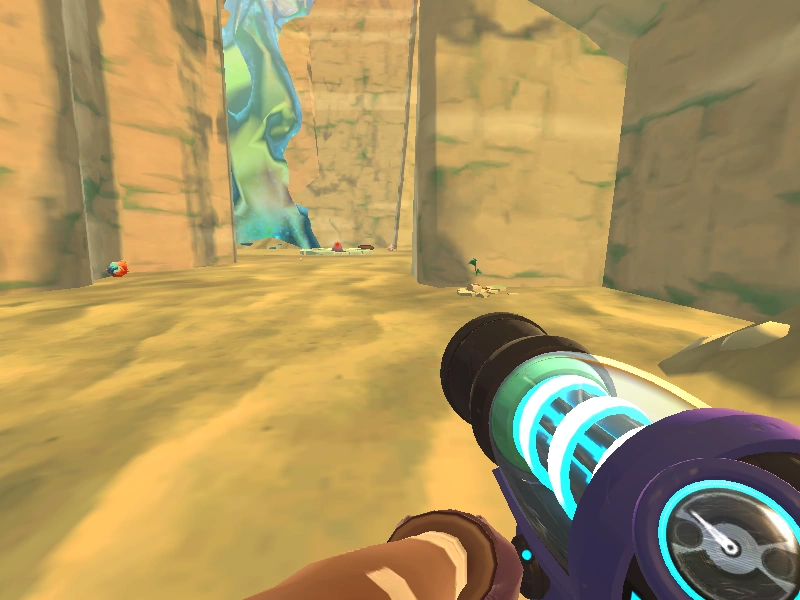
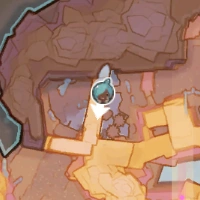
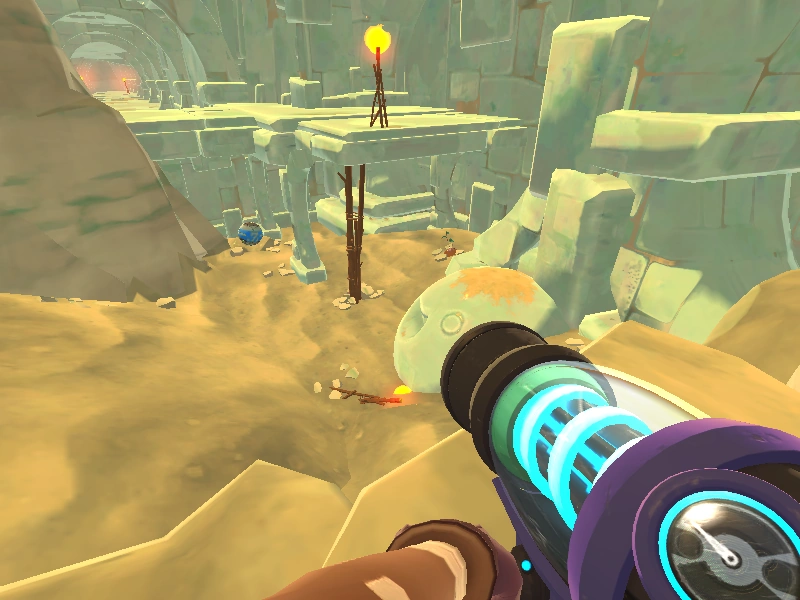
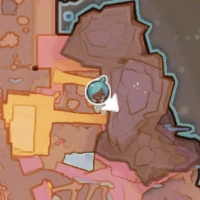
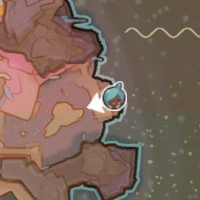
Map
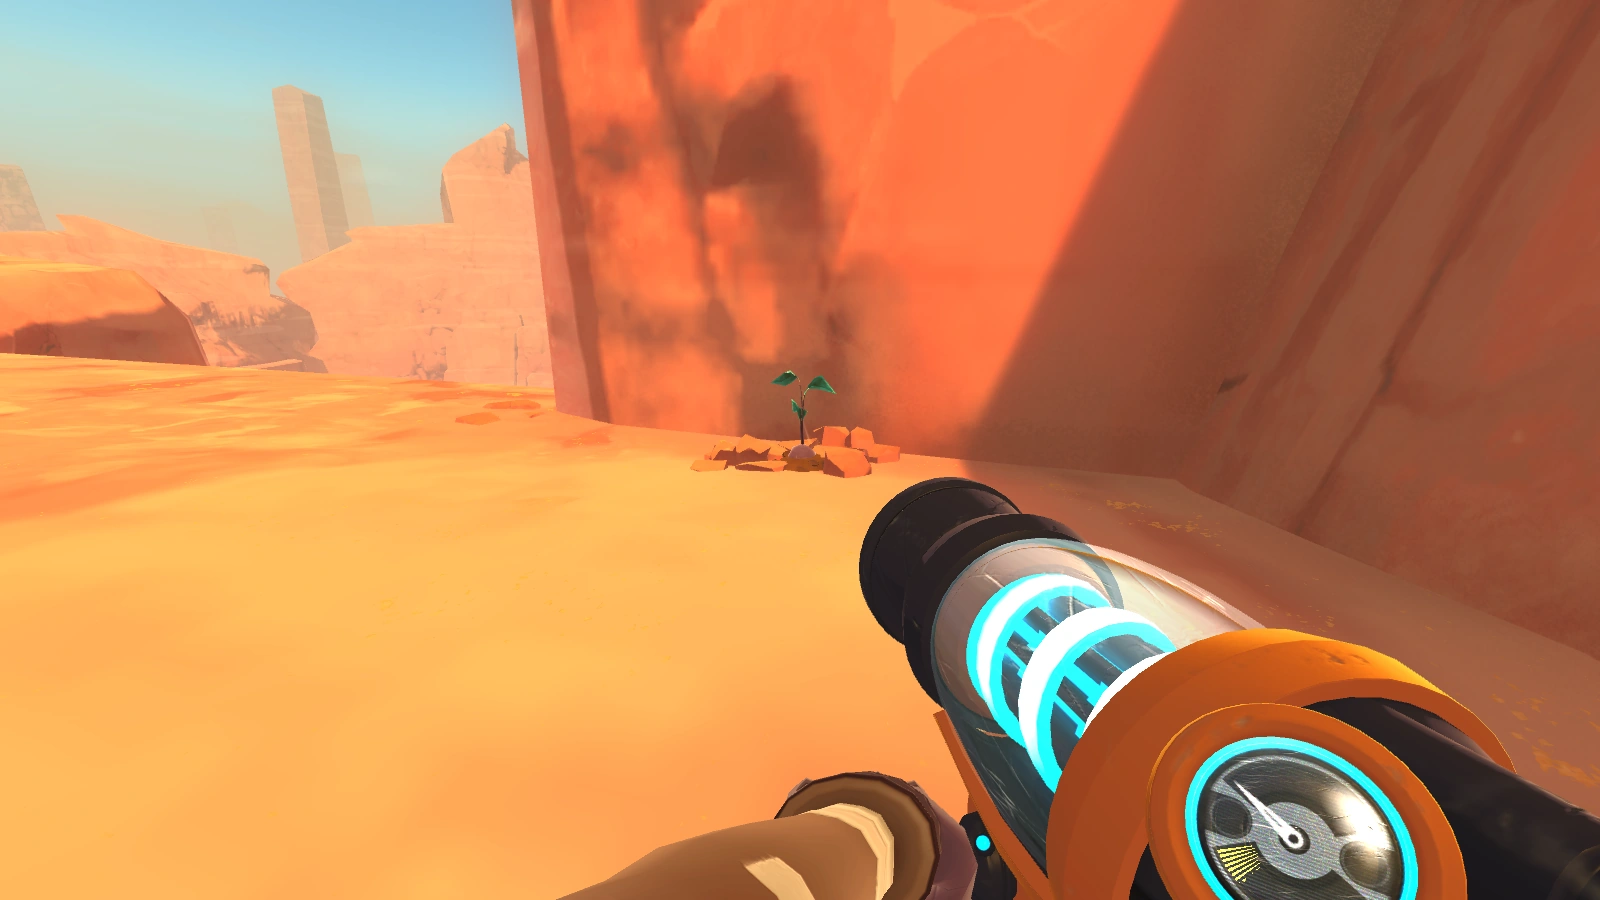
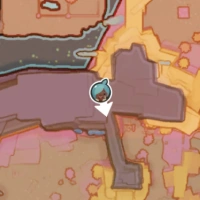
Glass Desert entrance
|
| |
|
| |
|
| |
|
| |

|
| |

|
| |
|
| |
|
| |
|
| |
|
| |
|
| |
|
| |

|
| |
|
| |
|
| |

|
| |
|
| |
|

| |
|
| |
|
| |
|
|
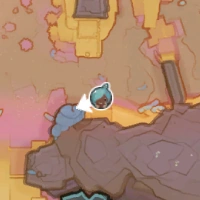
Tangle Gordo Tower Courtyard
|
| |
|
| |
|
| |
|
| |
|
| |
|
| |
|
| |
|
|
Miscellaneous
|
|
West Slime Gate
|
| |
|
| |
|
| |
|

| |
and #38 |
|
|
|
| |
|
| |
|
| |
|

|
Northern Glass Desert
|
| |
|
| |
|
| |
|
| |
|
| |
|
| |
|
| |
|
| |
|
| |
|
| |
|
| |
|
| |
|
| |
|
|
Behind the Mosaic Gordo
|
| |
|
| |
|
| |
|

|
East Slime Gate

|
| |
|
| |
|
| |
|
| |
|
| |
|
| |
|
| |
|
| |
|
| |
|
| |
|
|
| Map | World Map • Map Data Nodes |
|---|---|
| Upgrades | Ash Trough |
| Collectables | Gilded Ginger (Locations) • The Ranch Treasure Pods |